
The key to a successful transition from acoustic to electric violin is not just buying gear, but choosing components that translate your classical technique and tonal expectations into the electronic world.
- Your biggest enemy is « impedance mismatch, » which makes a great violin sound thin and scratchy. An acoustic amp or a preamp is the solution.
- The « feel » of a silent violin is close, but for practice, a wired connection is non-negotiable to avoid distracting latency.
- Effects like reverb aren’t just for rock sounds; they are essential tools for recreating the aural space and depth you’re used to from an acoustic instrument.
Recommendation: Prioritize an acoustic instrument amplifier and a quality, low-capacitance cable before all else. This foundation will do more to preserve your natural tone than the violin itself.
The first time you draw your bow across a fine acoustic violin, something magical happens. You feel the spruce top vibrate against your collarbone, the ribs resonating into your body. The sound isn’t just in the air; it’s a physical, tactile experience you’ve spent years, even decades, mastering. Now, you’re curious about the world of jazz, rock, or simply want to practice silently, and you’re faced with a wall of confusing terms: passive pickups, impedance, preamps, and solid-body designs. The common advice is to just grab a popular model and an amp, but this often leads to frustration.
Many classically trained players who make the leap are disappointed. They complain of a thin, « scratchy » tone, a dead feeling under their fingers, and a sound that feels disconnected from their bowing technique. The core issue is that most advice is gear-focused, not player-focused. It tells you *what* to buy, but not *how* that gear bridges the gap between your acoustic world and the new electric one. The fear is real: will all your hard-won nuance be lost in a sea of electronics?
This guide takes a different approach. We believe the secret isn’t to replace your technique, but to *translate* it. We’ll explore how to choose your first electric violin and the essential gear around it, with one goal in mind: preserving the touch, tone, and musicality you already possess. It’s about making technology serve your artistry, not the other way around. We will decode the tech to ensure your first electric experience is inspiring, not infuriating.
This article breaks down the essential considerations every classically trained violinist must understand before going electric. We will cover everything from the feel of silent practice to the science behind why your expensive instrument might sound cheap through the wrong gear.
Summary: A Classically-Trained Player’s Roadmap to the Electric Violin
- Headphone Practice: Does a Silent Violin Feel Like the Real Thing?
- Guitar Amps vs Acoustic Amps: Avoiding the « Electric Mosquito » Sound
- Reverb and Delay: Essential Pedals to Enrich Your Electric Tone
- Carbon Fiber vs Wood: Which Bow Survives Rock Gigs Better?
- Fitting Issues: Will Your Kun Rest Fit That Weirdly Shaped Electric?
- Tone Suck: Why Long Cheap Cables Kill High Frequencies
- Alcohol vs Shellac: Why Hand Sanitizer Melts French Polish
- Cables and Amps: Why Your £2000 Guitar Sounds Like Mud
Headphone Practice: Does a Silent Violin Feel Like the Real Thing?
One of the biggest draws of an electric violin is the promise of silent practice. For a classical player, the question isn’t just about silence, but about feel. An acoustic violin provides constant haptic feedback—the physical vibrations you feel through your chin, shoulder, and left hand. A solid-body « silent » violin won’t resonate in the same way, which can feel jarring at first. The instrument body itself will feel relatively « dead, » and all your auditory feedback will come through the headphones.
This is a manageable adjustment, but there’s a more critical technical pitfall: latency. Latency is the delay between when you play a note and when you hear it. For a musician whose technique is built on micro-second adjustments, this can be incredibly disruptive. While the convenience of Bluetooth headphones is tempting, it’s a trap for serious practice. Technical research shows they can introduce anywhere from 32 to 300+ milliseconds of latency, a delay that is definitely perceptible and can throw off your intonation and rhythm. For a truly responsive feel that mimics the immediacy of an acoustic instrument, a wired connection is non-negotiable.
This physical connection is the first step in ensuring your practice sessions are productive. It guarantees the sound you hear is an instant reflection of your bowing and fingering, allowing you to focus on tone production and technique without fighting the technology.
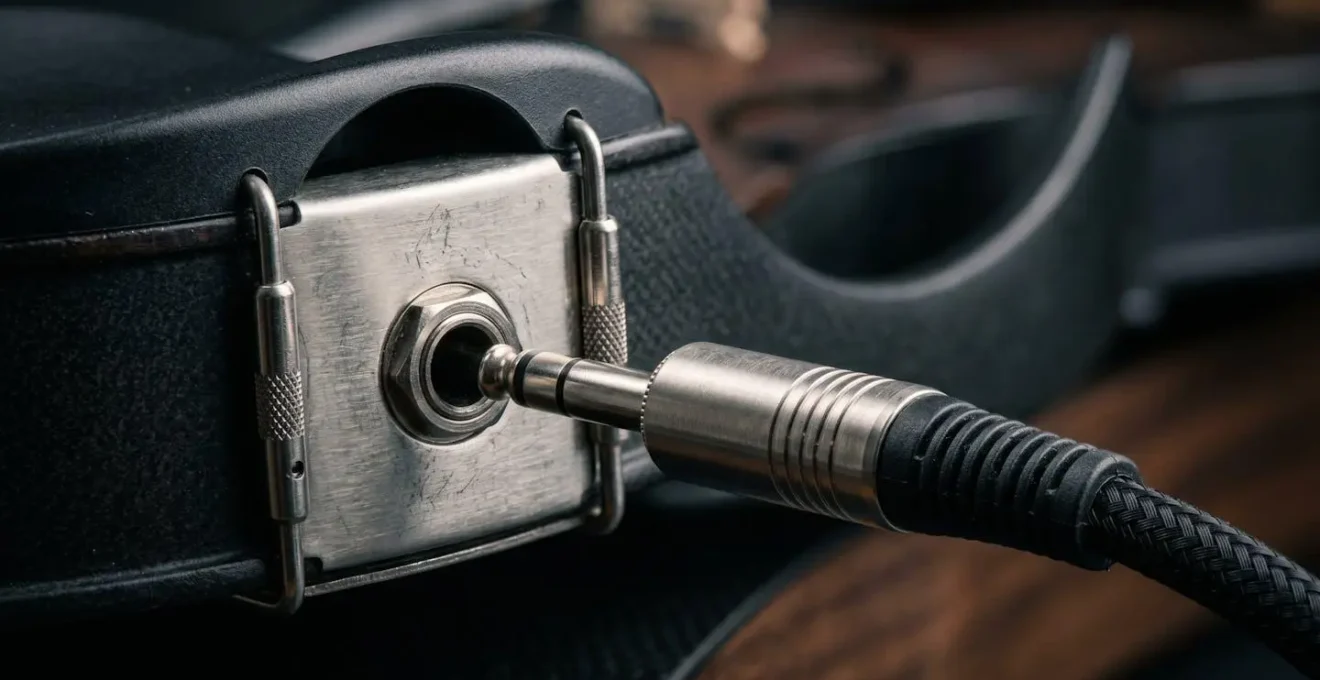
As you can see, the physical jack is your direct line to a zero-latency experience. This simple, high-fidelity connection is crucial for translating the precision of your classical training into the electronic realm. It ensures what you feel in your hands aligns perfectly with what you hear in your ears.
Guitar Amps vs Acoustic Amps: Avoiding the « Electric Mosquito » Sound
You’ve got your new electric violin, you plug it into your friend’s guitar amp, and… it sounds awful. Thin, shrill, and piercing—like an angry insect. This is the single most common and disheartening experience for new electric players. The problem isn’t your violin; it’s the amplifier. An electric guitar amp is voiced specifically for magnetic pickups and the frequency range of a guitar. It often has a built-in mid-range boost and a high-frequency roll-off designed to make guitars sound powerful, not to reproduce an acoustic sound faithfully.
When you send the bright, harmonic-rich signal of a violin through this kind of circuit, the result can be disastrous. As the experts at Electric Violin Shop aptly put it in their guide, this common mistake can be sonically offensive:
Violins and other string instruments tend to sound bright on their own, and when you play them through a brightly voiced guitar amp the sound can be like nails on a chalkboard.
– Electric Violin Shop, Choosing a Violin Amp Guide
The solution is an acoustic instrument amplifier. These amps are designed with a flatter, full-range frequency response, often featuring a dedicated tweeter to reproduce the delicate high-end frequencies of acoustic instruments. They are engineered for clarity and fidelity, aiming to amplify the natural sound of the instrument, not color it. This is the key to achieving a warm, rich tone that respects the natural voice of the violin.
Case Study: The Small Amp That Could
A violinist documented their success using the compact Yamaha THR5a acoustic practice amp for small venue gigs. While its sibling amps in the THR series are for electric guitars, the ‘a’ model is specifically voiced for acoustic instruments. Its built-in digital microphone modeling technology effectively processes the raw signal from a piezo pickup, transforming it into a sound that is rich, natural, and far from the dreaded « mosquito » tone. This demonstrates that choosing an amp designed for the *source* instrument is critical for good tone.
Reverb and Delay: Essential Pedals to Enrich Your Electric Tone
On an acoustic violin, you are never playing in a vacuum. The room you are in—be it a practice room, a concert hall, or a cathedral—is an active part of your instrument. Its surfaces reflect sound, creating natural reverberation (reverb) and echoes (delay) that give your tone space, depth, and warmth. When you play a solid-body electric violin, especially through headphones, this entire aural architecture disappears. The sound can feel dry, clinical, and unpleasantly close to your ear.
This is where effects pedals become essential tools for tonal translation, not just for creating wild rock sounds. Reverb and delay pedals are not about masking your sound; they’re about rebuilding the natural acoustic environment your ear expects to hear. A touch of « hall » reverb can make a silent violin feel like it’s being played in a beautiful concert hall, while a subtle delay can add a sense of space and dimension. These effects give your sound breath and life, making the playing experience far more organic and inspiring.
Building your sound starts with a clean slate and adding elements intentionally. The order in which you place your pedals in the signal chain dramatically affects the final outcome. Starting with a solid tonal foundation and then adding ambiance is the professional approach.
Your Action Plan: Building Your First Effects Chain
- Start with the dry sound from your violin and consider a noise gate or EQ first to tame any unwanted electronic interference or bow noise.
- Place an EQ pedal near the beginning of the chain. Use it to gently cut the harshest high frequencies to find a warmer, less metallic core sound before any other effects are applied.
- Add your ambient effects, like reverb and delay, after the EQ. This allows you to add space and depth to an already well-shaped tone.
- Experiment with effect order. A chain like ‘Reverb + Distortion + Delay’ will produce a drastically different texture than ‘Distortion + Delay + Reverb’. There are no wrong answers, only different sounds.
- Use the ‘wet/dry’ mix knob on each pedal. This is your most important control for preserving your classical dynamics. Start with a mostly dry signal and blend in just enough of the effect to add color without overwhelming your natural playing.
Carbon Fiber vs Wood: Which Bow Survives Rock Gigs Better?
As a classical violinist, your bow is an extension of your arm, and you likely have a deep appreciation for the feel and response of a traditional pernambuco or Brazilwood bow. However, the demands of playing electric violin in a non-classical setting—a loud stage, an outdoor festival, a cramped pub—introduce new challenges. Wood bows are sensitive to changes in temperature and humidity, which can affect their camber and playability. They are also more susceptible to damage from an accidental drop or knock on a cymbal stand.
This is where carbon fiber bows shine. Originally seen as a student-level alternative, high-quality carbon fiber bows are now widely used by professionals for their incredible durability and consistency. They are virtually impervious to weather changes, making them a reliable choice for gigging musicians who perform in varied environments. As editor Laurie Niles of Violinist.com notes, their manufacturing process offers a key advantage: « Wood is extremely variable, but carbon fiber is not, so it’s possible to make bows that are very consistent in weight, balance and feel. » This consistency means you can have a dependable, great-playing bow that you don’t have to worry about on a chaotic stage.
While a fine wooden bow may still be your choice for nuanced classical recording, a high-performance carbon fiber bow is arguably the superior tool for the rigors of live electric performance. It offers peace of mind without a significant compromise in performance.

The resilience of a carbon fiber bow means you can perform with confidence in any setting, from a controlled studio to a demanding outdoor stage. It’s a tool built for the working musician, ready to withstand conditions that would put a delicate wooden bow at risk.
Fitting Issues: Will Your Kun Rest Fit That Weirdly Shaped Electric?
Ergonomics are deeply personal for a violinist. You’ve spent countless hours finding the perfect combination of shoulder rest and chin rest that allows for a comfortable, tension-free posture. A major point of anxiety when switching to an electric is whether you’ll be able to replicate this setup, especially with the radical body shapes of many electric models. The good news is that many manufacturers are well aware of this concern.
Many electric violins, particularly those aimed at the crossover market, are designed to be compatible with standard fittings. However, it’s not a universal guarantee. Some minimalist or « skeletal » designs lack the traditional lower bout block where a shoulder rest’s feet would normally grip. These models often require a proprietary mounting system designed specifically for that instrument’s frame. It is absolutely crucial to verify this before purchasing.
Beyond simple compatibility, the weight and balance of an electric violin are different. A solid-body instrument is typically heavier than its acoustic counterpart. This means a shoulder rest that was stable with your acoustic might feel less secure or might not distribute the weight as comfortably. Testing the exact combination of your chosen violin and your preferred shoulder rest is non-negotiable. Here are some key compatibility points to be aware of:
- Yamaha YEV series: These are designed with traditional body contours and accept most standard shoulder rest mounts without any issue.
- NS Design CR-series: These instruments have a unique frame and require a proprietary mounting bracket system to attach a shoulder rest.
- GEWA Novita 3.0: While compatible with standard mounts, its solid-body design has a different weight distribution that should be tested for comfort.
- Wood Violins: Models like the Viper have their own integrated chest support system, while their more traditionally shaped violins often accept standard rests.
- General Rule: Always, always test your preferred shoulder rest with the specific electric model you intend to buy. Check for stability, comfort, and how the overall balance feels on your neck and shoulder.
Tone Suck: Why Long Cheap Cables Kill High Frequencies
You have a great violin and the perfect acoustic amp, but your sound is still dull and lifeless, as if a blanket has been thrown over the speaker. The culprit might be something you’ve barely considered: your cable. This phenomenon, known as « tone suck, » is a result of cable capacitance. In simple terms, every cable has a natural electrical property (capacitance) that acts like a tiny filter, bleeding off high frequencies. The longer the cable and the cheaper its construction, the more high-end clarity you lose.
This problem is especially pronounced with electric violins that use a passive piezo pickup (meaning, no battery on board). As the technical guide from Electric Violin Shop explains, « The high-impedance signal from a violin’s passive piezo pickup is ‘fragile’ and highly susceptible to capacitance, far more so than the active pickups on a typical electric guitar. » This fragile, high-impedance signal is easily degraded by long cable runs or a chain of true-bypass pedals, resulting in a muffled tone.
Fortunately, there is a simple and elegant solution used by professionals to preserve their signal integrity. It involves converting the signal from high impedance to low impedance as early as possible in the signal chain.
Case Study: The Buffered Pedal Solution
To combat « tone suck, » many professional electric violinists place a buffered pedal as the very first thing in their signal chain after the violin. A common choice is a BOSS tuner pedal, as most BOSS pedals contain a high-quality buffer. This buffer acts like a small, dedicated preamp. It takes the fragile, high-impedance signal from the passive pickup and converts it into a robust, low-impedance signal. Once converted, the signal is much more resilient and becomes virtually immune to the tone loss caused by long cables or multiple subsequent pedals. This simple act preserves the brilliant high frequencies and harmonics that are essential to a vibrant violin tone.
Alcohol vs Shellac: Why Hand Sanitizer Melts French Polish
While your electric violin is a piece of modern technology, it may still share some delicate DNA with its acoustic ancestors. Many high-end electric and acoustic-electric violins use traditional materials and finishes, such as ebony fingerboards and a beautiful, glossy French polish (made from shellac). These elements require the same care as a fine acoustic instrument, and one of the biggest modern threats is surprisingly common: alcohol.
Alcohol is a solvent for shellac. This means that hand sanitizer, rubbing alcohol, or even certain perfumes and cleaning agents can instantly melt and permanently damage a French polish finish, leaving a cloudy, sticky mess. Even if your violin has a more durable modern polyurethane finish, alcohol can be detrimental to wooden components like the fingerboard. Alcohol-based cleaners can strip the natural oils from ebony or rosewood, leading to drying, shrinkage, and potentially even cracks over time. Never use them on your fingerboard.
Beyond the finish, the electronic components themselves require routine, mindful maintenance to ensure reliability during a performance. A crackly knob or a dead battery can ruin a show. Adopting a simple maintenance routine is part of owning a professional instrument.
- Output Jack: Check the nut on your output jack monthly. If it becomes loose, the entire jack can spin internally, twisting and breaking the delicate wires and leading to signal failure.
- « Crackly » Knobs: If your volume or tone knobs make a scratching sound when you turn them, they can be cleaned with a dedicated electronics contact cleaner spray designed for potentiometers.
- Battery Terminals: For active violins (with a battery), check the battery compartment quarterly for any white, corrosive dust on the terminals, which can cause power interruptions.
- Battery Drain: Never store an active violin with the cable plugged in. This keeps the preamp circuit engaged and will drain your battery even when you’re not playing.
Key Takeaways
- The single most important gear choice is an acoustic amplifier, not a guitar amp, to avoid a thin, harsh tone.
- For practice, always use wired headphones. Bluetooth introduces latency that will interfere with your technique.
- Your signal chain matters. Use a buffer or preamp first with passive violins to prevent « tone suck » from long cables.
Cables and Amps: Why Your £2000 Guitar Sounds Like Mud
We’ve come full circle, back to the foundational elements of your electric sound: the amplifier and the cables that connect it. Everything we’ve discussed—preserving tone, translating feel, building an aural architecture—relies on these components working in harmony. The central, non-negotiable concept you must understand is impedance. It’s the technical reason behind the « mosquito sound » and the « blanket over the speaker » effect. In short, passive piezo pickups (high impedance) must be plugged into an input designed to handle them (a high-impedance or « High-Z » input).
Plugging a high-impedance source into a low-impedance (« Low-Z ») input, like the line input on a mixing board, creates an « impedance mismatch. » This mismatch strangles your tone, stripping it of its low-end fullness and high-end sparkle. An acoustic amp has a High-Z input designed for this. A DI box (Direct Input box) or a preamp pedal serves the same purpose: it correctly converts the signal for plugging into other gear. Knowing which input to use is critical.
This table breaks down the common input types and how they interact with your electric violin. Mastering this will save you endless frustration.
| Input Type | Impedance Level | Compatible With | Sound Result | Recommended Use |
|---|---|---|---|---|
| High-Z (High Impedance) | 1MΩ or higher | Passive piezo pickup violins | Full, rich tone with preserved harmonics | Direct connection from passive electric violin |
| Low-Z (Low Impedance) | 10kΩ or lower | Active electronics, mics | Thin, scratchy, strangled tone from passive violin | Only after preamp/DI box conversion |
| Instrument Input (Guitar Amp) | High-Z compatible | Most electric violins | Variable – check amp voicing | Use acoustic amp model, not electric guitar voicing |
| Line Input (Mixer/Interface) | Low-Z | Requires active preamp first | Weak without proper impedance matching | Use DI box or preamp before line input |
Finally, when you’re ready to perform, you need an amp with enough power to deliver a clean, undistorted sound at stage volume. This is called « clean headroom. » For a gigging electric violinist, professional guides suggest you should aim for an amplifier with 40-100 watts for live performance to ensure you have enough power to be heard clearly without pushing the amp into distortion.
Now that you are armed with the knowledge to translate your classical skills into the electric world, the next step is to begin thoughtfully assembling your rig. Start with the foundation—a quality cable and the right kind of amplifier—and build from there. Your journey into new sonic territories has just begun.