Contrary to the popular belief that « it’s your instrument, do what you want, » every aesthetic modification is a permanent transaction with its physics, chemistry, and future financial worth.
- Irreversible changes like refinishing or adding stickers can cause permanent finish damage and significantly dampen acoustic resonance.
- Originality is paramount in the collector’s market; « upgrades » often decrease the value of a vintage or high-end instrument.
Recommendation: Prioritize fully reversible modifications. Before any permanent change, understand your instrument’s finish type and weigh the creative desire against the potential loss of tonal character and monetary value.
The urge to make an instrument your own is a powerful part of the creative journey. It’s a desire I see in my workshop every week. A guitarist wants to add a splash of color, a bassist dreams of a punk-rock sticker collage, a mandolin player considers swapping out the hardware. The common wisdom is encouraging: « It’s your tool, your voice, make it reflect you! » While the sentiment is noble, it dangerously overlooks the intricate science of lutherie. An instrument is not a blank canvas; it is a finely tuned system of vibrating woods, delicate finishes, and engineered components.
Many musicians approach customization with the same casualness as decorating a phone case, only to face regret years later. They discover that a thick coat of paint has muted the wood’s natural voice, or that a sticker applied in a moment of youthful rebellion has left a permanent, ghostly scar on a valuable vintage finish. The conversation often stops at aesthetics, failing to address the deeper consequences. We rarely discuss the chemistry of solvents, the physics of mass damping, or the brutal realities of the collector’s market. This is where the true cost of customization lies.
This guide changes that. We will move beyond the superficial and dissect the real-world impact of your creative choices. My goal is not to discourage personality, but to arm you with the technical knowledge of a luthier. By understanding the permanent transaction you are making with your instrument’s physics and future value, you can express yourself without unknowingly sabotaging the very thing you love. We will explore the science behind finish damage, the debate over tone wood, the strategies for reversible modifications, and the hard financial lessons from the vintage market, ensuring your personal touch enhances your instrument, rather than compromises it.
To navigate these critical decisions, this article breaks down the key areas where aesthetics and instrument integrity collide. The following sections provide a detailed roadmap for any musician considering a modification, from the seemingly innocent sticker to a full hardware overhaul.
Summary: Customizing Your Instrument: Aesthetics vs Value
- The Punk Rock Regret: Cleaning Old Stickers Off a Guitar
- Tone Wood vs Paint: Does Re-finishing Kill the Sound?
- Reversible Mods: Changing the Look Without Drilling Holes
- Gold vs Chrome: Upgrading Hardware for a Custom Vibe
- Modified vs Original: Why Collectors Hate Your Upgrades
- Nylon vs Tortex vs Ultex: How Plastic Changes Attack
- Alcohol vs Shellac: Why Hand Sanitizer Melts French Polish
- Cleaning Your Instrument: The Do’s and Don’ts of Polishing and Oiling
The Punk Rock Regret: Cleaning Old Stickers Off a Guitar
It often starts here, with a simple sticker. It’s the easiest way to claim an instrument, a badge of honor from a favorite band or brand. For years, it looks great. But when tastes change and the time comes for removal, the true cost is revealed. This is what I call ‘sticker archaeology’—excavating the history of past decisions from an instrument’s finish. The primary issue lies in the complex interaction between adhesives, finish chemistry, and ultraviolet light.
The most vulnerable finishes are the vintage-style nitrocellulose lacquers found on high-end or older instruments. These finishes are porous and cure over decades, making them highly susceptible to chemical reactions. Research confirms that nitrocellulose finishes are significantly damaged by standard sticker adhesives, which can leach plasticizers into the lacquer, causing it to soften, bubble, or discolor permanently. Modern polyurethane or polyester finishes are far more resilient, but they are not immune to the second major issue: UV exposure.
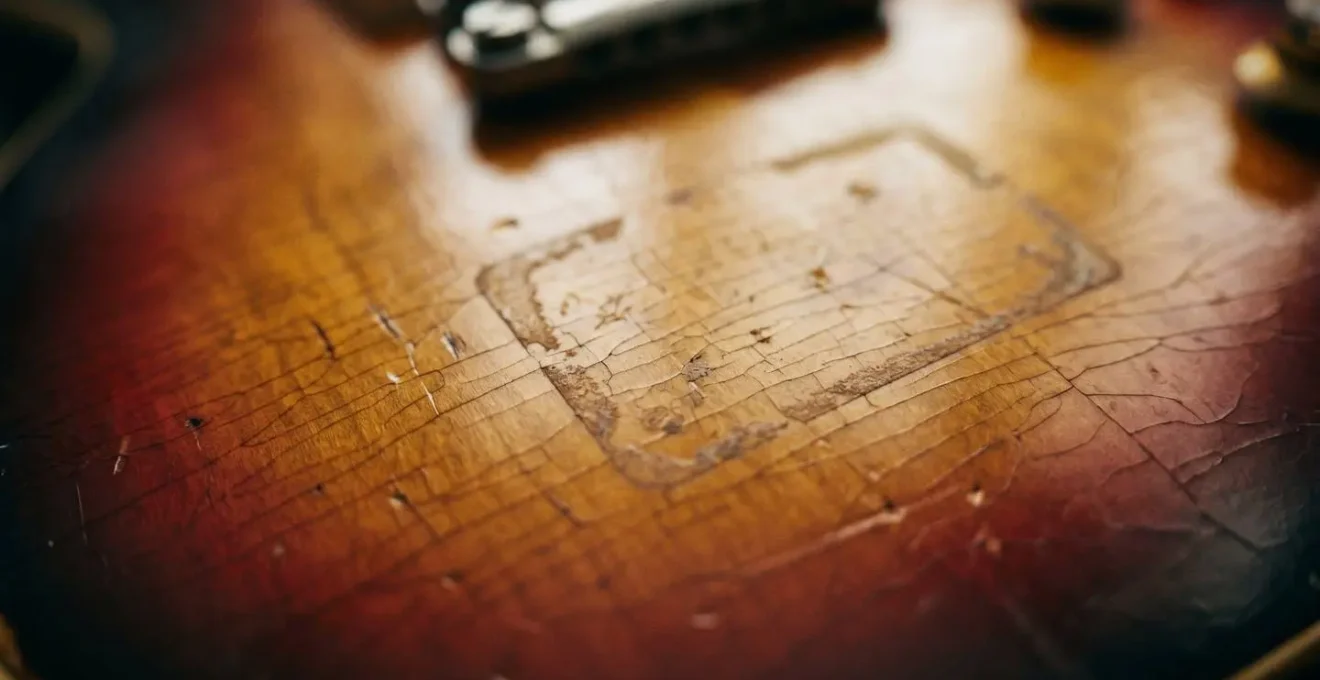
Over time, an instrument’s finish naturally ages and changes color when exposed to light. A sticker acts as a tiny sunblock, perfectly preserving the original color underneath it. When you peel it off years later, you are left with a « tan line »—a ghostly, brighter-colored outline of the sticker that will never match the surrounding, aged finish. This is an irreversible alteration that telegraphs the instrument’s modification history to any future buyer. Removing the adhesive residue itself is another minefield, where using the wrong solvent can instantly melt the finish you were trying to save.
What begins as a fun, temporary statement often becomes a permanent, and sometimes costly, lesson in finish chemistry. It’s the classic punk rock regret: a testament to a past aesthetic that leaves an indelible mark on the instrument’s future.
Tone Wood vs Paint: Does Re-finishing Kill the Sound?
Moving beyond stickers, a full refinish seems like the ultimate way to personalize an instrument. Whether restoring a damaged finish or simply changing the color, the process involves stripping the body to bare wood and applying a new coat. The eternal debate among players and luthiers is whether this drastic change affects the instrument’s tone. The short answer is yes. The science behind it lies in two principles: mass loading and vibrational damping.
An acoustic or semi-hollow instrument produces sound by the vibration of its wooden top (the soundboard). Even a solid-body electric guitar’s resonance contributes to its sustain and tonal character, which the pickups then translate. A guitar’s finish, while thin, adds mass and stiffness to the wood. A thick, heavy finish—especially a hard modern polyester—acts like a mute, restricting the wood’s ability to vibrate freely. This is vibrational damping. It can reduce acoustic volume, shorten sustain, and subdue the complex overtones that give an instrument its unique voice.
In an experiment on the zZounds Music Blog, a player stripped the thick polyurethane finish from a Squier Stratocaster and recorded it before and after. The result was a subjectively more pleasing and resonant tone, with the instrument feeling « liberated » and having a noticeably improved acoustic voice. This aligns with luthier observations that excessive paint thickness adds mass and dampens the wood’s natural resonance. Conversely, the ultra-thin nitrocellulose finishes of the 1950s and ’60s are prized precisely because they are minimal, allowing the wood to breathe and vibrate with the least possible interference. The finish becomes a part of the tonal system, not a constraint upon it.
Therefore, refinishing isn’t just a color choice; it’s a structural change to the instrument’s acoustic engine. A poorly executed or overly thick paint job can audibly compromise the very tonal quality the instrument was designed to produce.
Reversible Mods: Changing the Look Without Drilling Holes
After understanding the permanent consequences of stickers and refinishing, the desire for personalization doesn’t have to end. The luthier’s approach is to channel this creativity towards modifications that honor the instrument’s integrity. The golden rule is reversibility. A truly smart modification is one that can be completely undone, leaving no trace of its existence. This strategy allows you to express your style while preserving the instrument’s original condition and value.
The focus shifts from altering the core of the instrument (its wood and finish) to swapping its bolt-on components and accessories. These parts are designed to be removable and replaceable. Think of it as changing the instrument’s attire rather than performing surgery. You can achieve a dramatically different look without ever picking up a drill or opening a can of solvent. This approach is the key to worry-free customization.
Here are some of the most effective and completely reversible ways to change your instrument’s appearance:
- Custom Straps: The most obvious and expressive accessory. It adds immense personality with zero permanent modification to the instrument itself.
- Swappable Pickguards: On instruments with existing pickguards, swapping for a different color or material is a simple screw-out, screw-in job. For acoustic guitars, static-cling or adhesive-backed pickguards can be added and removed without damage.
- Custom Truss Rod Covers: On the headstock of many guitars, this small plate is held on by a few screws and is easily replaced with a custom-engraved or exotic wood version.
- Engraved Neck Plates: For bolt-on neck guitars (like Fender models), the square metal plate on the back is a perfect canvas for custom engraving and is a direct, four-screw replacement.
- Specialized Knobs and Pickup Rings: Control knobs and the plastic rings surrounding pickups are easily swapped. Changing from black plastic to cream, or from standard knobs to something more ornate, can drastically alter the visual vibe.
This philosophy of reversible modification is the sweet spot between personal expression and responsible ownership. It allows your instrument to evolve with your style, without inflicting permanent scars that you—or a future owner—might come to regret.
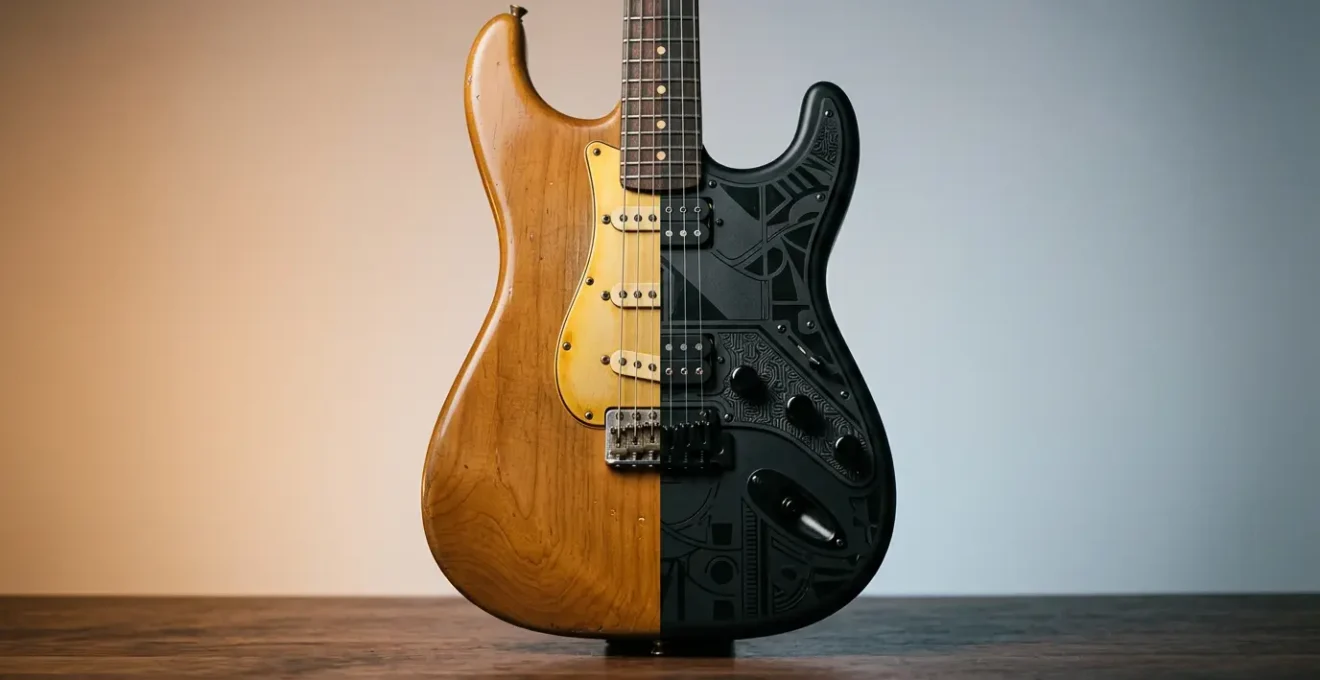
Gold vs Chrome: Upgrading Hardware for a Custom Vibe
Upgrading hardware—tuners, bridges, knobs, and pickups—is a common step in customizing an instrument. Often, the motivation is purely aesthetic: swapping chrome for gold, or nickel for black, to create a specific look. However, as with any modification, there are deeper considerations. From a luthier’s perspective, hardware is not just jewelry; it’s a critical part of the instrument’s functional and tonal system. The material of the hardware can have a subtle but real effect on the sound.
The bridge and tailpiece, for instance, are the primary points of energy transfer from the strings to the body. The mass and density of the metal used can influence sustain and harmonic content. As one analysis of custom guitar design points out, the choice of material is not just for show:
Different base materials like steel vs. aluminum vs. brass bridges produce measurable tonal and sustain differences beyond just color aesthetics.
– Custom Guitar Design Analysis, Mythic Guitar Company
A lightweight aluminum bridge might contribute to a more resonant, airy tone, while a high-mass brass or steel bridge could increase sustain. While the pickups remain the dominant factor in an electric guitar’s sound, these mechanical differences are part of the complex recipe that creates the final voice.
The finish of the hardware also has long-term implications for value and aesthetics. Each type of plating ages differently. Chrome is the most durable and will resist corrosion for decades, staying pristine. Nickel, common on vintage-reissue instruments, is softer and will tarnish and wear over time, developing a desirable ‘patina’ that collectors value. Gold plating is the most delicate; it’s an extremely thin layer that can wear away with contact from skin and sweat, revealing the nickel or chrome base metal underneath. This wear can look worn-out rather than gracefully aged, potentially affecting resale value.
Choosing new hardware, therefore, involves balancing the desired look with an understanding of its potential impact on tone and its long-term durability. It’s another layer where an informed decision separates a tasteful upgrade from a future disappointment.
Modified vs Original: Why Collectors Hate Your Upgrades
Here we arrive at the most brutal truth in the world of instrument customization: in the high-end and vintage markets, originality is king. While you may believe you are « upgrading » your instrument with better pickups or more stable tuners, a collector sees something different. They see a compromised historical artifact. Every solder joint broken, every hole drilled, and every original part discarded chips away at the instrument’s market value.
The logic is simple: a collector wants an instrument that is as close as possible to the way it left the factory. It represents a specific point in time and craftsmanship. Modifications, even if they improve playability or tone in a modern context, erase that originality. This preference is not just sentiment; it has a massive financial impact. General resale market analysis suggests that well-maintained guitars with original components command 10-20% higher prices than even slightly modified counterparts. On rare, high-value instruments, that percentage translates to a staggering loss.
There is no more powerful illustration of this principle than the story of a rare Martin acoustic, as documented in the vintage market. It provides a stark lesson in the financial cost of ‘restoration’.
Case Study: The $300,000 Refinish
The value gap between original and modified instruments is immense. A restored 1939 Martin D-45, a holy grail guitar, was sold at auction. As detailed in an analysis by Vintage Guitar World, the restored instrument fetched approximately $187,000. While a massive sum, pristine, all-original examples from that same year command prices closer to $500,000. The refinish and repairs, however expertly done, effectively erased over $300,000 in market value. This demonstrates that for collectors, condition and originality are far more significant factors than rarity alone.
This principle applies down the line. A 1960s Fender Stratocaster with its original, less-than-perfect tuners is worth significantly more than the same guitar with modern, more stable replacements. Why? Because the goal is not to have the ‘best’ functioning guitar in a modern sense, but the most authentic historical piece. Saving the original parts in a box helps, but the act of modification itself—the broken solder, the marks from new screws—is damage that cannot be undone.
Before you upgrade, ask yourself what the instrument is: is it a working tool that must be adapted for your needs, or is it also an investment whose future value depends on its purity? For a modern, mass-produced instrument, this may not be a major concern. For anything vintage, rare, or potentially collectible, every modification is a high-stakes gamble with its value.
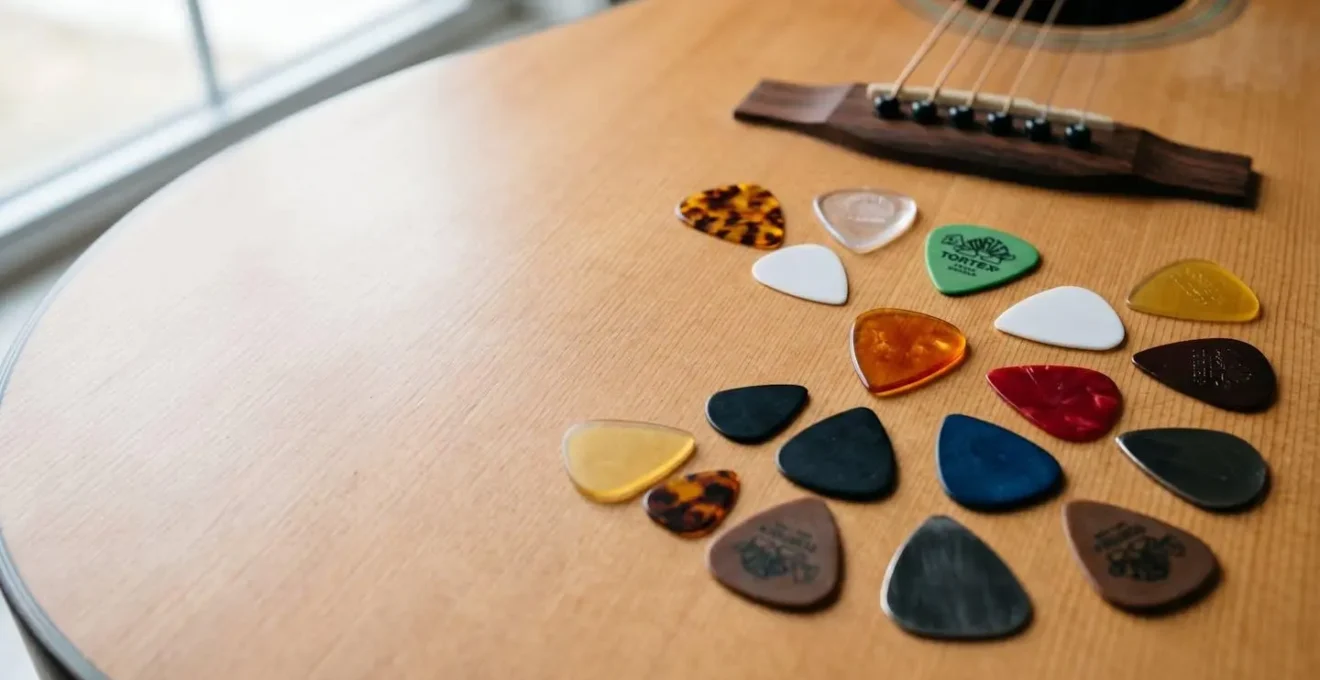
Nylon vs Tortex vs Ultex: How Plastic Changes Attack
While major modifications like refinishing get the most attention, even the smallest, most disposable point of contact with your instrument—the pick—has a profound effect on its tone. Players often choose a pick based on feel and durability, but the material itself is a powerful EQ tool. Switching from a flexible nylon pick to a stiff Ultex pick can change your sound as much as adjusting the knobs on your amplifier. This is a perfect example of a 100% reversible modification with a massive tonal impact.
The science is about energy transfer and material hardness. When you strike a string, the pick flexes. That flex absorbs energy that would otherwise go into making the string vibrate. Acoustic physics research shows that in controlled tests, a rigid pick can achieve 85-95% energy transfer to the string, producing a loud, bright, and clear attack. In contrast, a flexible pick might only manage 60-75% transfer, with the rest of the energy lost to the pick bending. This results in a softer, warmer, and quieter sound.
The material’s hardness also scrapes against the string’s windings, generating different harmonic content. This isn’t just a placebo effect; spectrogram analysis confirms that the frequency response can change by 2-8 decibels when switching pick materials, a difference easily detectable by the human ear.
- Nylon: A classic warm, soft material. It has a lot of flex, which smooths out the attack and emphasizes lower-mid frequencies. Great for gentle strumming.
- Tortex (Delrin): Designed to mimic tortoiseshell, it’s brighter than nylon with a crisp attack. It’s a very balanced, all-purpose material.
- Ultex: One of the stiffest and most durable plastics. It has almost no flex, resulting in maximum energy transfer, a very bright and articulate tone, and loud volume. Perfect for fast picking and aggressive styles.
Before you consider swapping pickups or changing your amp settings, spend some time exploring different pick materials. You may find that the tonal change you’re looking for is already in your pocket, offering a powerful lesson in how the smallest components can make the biggest difference.
Alcohol vs Shellac: Why Hand Sanitizer Melts French Polish
Perhaps the most tragic form of instrument damage is the one that happens by accident. In the workshop, I’ve seen beautiful, expensive finishes on acoustic guitars and violins literally melted and smeared by a single, innocent mistake. The culprit is almost always alcohol. Understanding the extreme vulnerability of certain finishes to common chemicals is not just about cleaning; it’s about protecting your instrument from the environment around you.
The core principle is « like dissolves like. » Many traditional and high-end instrument finishes are alcohol-based. French polish, a prized finish on classical guitars and violins, is nothing more than shellac flakes dissolved in alcohol. Nitrocellulose lacquer, while more robust, is also vulnerable to organic solvents. When these finishes come into contact with alcohol, the solvent begins to do what it was originally designed to do: dissolve the finish. This can happen in seconds.
The most common sources of accidental exposure are everyday products. Hand sanitizer is the number one offender. A musician cleans their hands, doesn’t let them dry completely, and then picks up their vintage Martin or Gibson. The residual alcohol on their palm transfers to the guitar neck or body, instantly softening and smudging the lacquer. Other sources include spilled alcoholic drinks at a gig, bug spray containing DEET (another powerful solvent), or even certain perfumes and colognes. This is why it’s critical to know what kind of finish your instrument has.
Your Finish Protection Checklist: Identifying Danger Zones
- Nitrocellulose Finishes: Check if your instrument is a vintage or high-end model (e.g., Gibson, Martin, Fender Custom Shop). These are the most vulnerable to alcohol, perfumes, and insect repellents. Aged nitro can be even more brittle.
- Shellac/Varnish Finishes: If you own a classical guitar, violin, or other orchestral string instrument, assume the finish is extremely vulnerable to alcohol. This is a primary danger zone.
- Polyurethane/Polyester Finishes: Common on most modern, mass-produced instruments (many Fenders, Squiers, Ibanez). These are highly resistant to most chemicals and are generally safe from accidental alcohol contact.
- Manufacturer Specs: When in doubt, always check the manufacturer’s specifications for your specific model to confirm the finish type.
- Inconspicuous Spot Test: Before ever applying a new cleaner or polish, test it on a very small, hidden area, such as inside the control cavity or under the neck heel.
Ultimately, protecting your instrument’s finish is about creating a safe zone around it. It means being mindful of what’s on your hands, on your clothes, and in the air at a gig. A moment of carelessness can cause damage that requires thousands of dollars in professional restoration.
Key Takeaways
- Every modification, from a sticker to a refinish, has a permanent consequence on an instrument’s physical and financial state.
- Originality is the most valuable attribute in the vintage and high-end market; « upgrades » almost always decrease collector value.
- Prioritize fully reversible mods like swapping straps, knobs, or pickguards to express personal style without causing irreversible damage.
Cleaning Your Instrument: The Do’s and Don’ts of Polishing and Oiling
After exploring the many ways an instrument’s finish and value can be accidentally or intentionally compromised, the final piece of the puzzle is proper maintenance. Cleaning an instrument is not like wiping down a piece of furniture. Each component is made of a different material with specific needs and vulnerabilities. Using the wrong product can be just as damaging as the modifications we’ve discussed. A luthier’s approach to cleaning is systematic, treating each part of the instrument with the correct method.
The most common mistake is using a single, all-purpose product. A polish that works wonderfully on a durable polyurethane body can destroy a delicate nitrocellulose finish. An oil that nourishes a rosewood fretboard will damage a finished maple one. The key is to identify the material and use a dedicated, safe cleaning agent for it. A clean, dry microfiber cloth is your most important tool, but for deeper cleaning, a more specific approach is required.
The following table breaks down the proper cleaning methods for the most common materials found on guitars. This data, compiled from expert forums and luthier practices, serves as a definitive guide to safe maintenance. As outlined in discussions among restoration experts, using the right product is non-negotiable for long-term care.
| Component / Material | Safe Cleaning Method | Products to AVOID | Special Notes |
|---|---|---|---|
| Nitrocellulose Finish | Damp microfiber cloth with dish soap, or Virtuoso brand cleaner, or Naphtha/lighter fluid | Acetone, nail polish remover, Goof Off, alcohol-based products, silicone polishes | Most fragile finish – test any product on hidden area first |
| Polyurethane/Polyester Finish | Standard guitar polish, damp cloth with mild soap | Harsh abrasives, acetone | Most durable finish – resistant to most chemicals |
| Rosewood/Ebony Fretboard | Lemon oil or mineral oil sparingly (1-2x per year) | Water, silicone products, furniture polish | Only oil when visibly dry – over-oiling damages wood |
| Maple Fretboard (finished) | Damp cloth only, no oils | Lemon oil, mineral oil (will damage finish) | Treated like finished wood, not bare fretboard |
| Nickel Hardware | Soft dry cloth, or Naphtha for stubborn grime | Harsh metal polishes that remove patina | Patina is desirable for vintage aesthetic |
| Chrome/Gold Hardware | Microfiber cloth, mild soap solution for chrome | Abrasive polishes (especially for gold plating) | Gold plating is thin and wears away easily |
By treating your instrument not as a single object but as a collection of unique materials, you adopt the mindset of a true caretaker. This careful, respectful approach to cleaning is the final expression of an owner who values their instrument not just as a tool for making music, but as a complex and beautiful object worthy of preservation.