In summary:
- Your instrument begins to degrade the moment you stop playing due to moisture, acid, and temperature shock.
- A two-minute « damage-control protocol » is more effective than long, infrequent cleanings.
- This routine involves targeted actions: swabbing moisture, wiping corrosive residue, and stabilizing the instrument’s environment.
- Each step is based on the material science of wood and metal, preventing costly repairs and extending the instrument’s life.
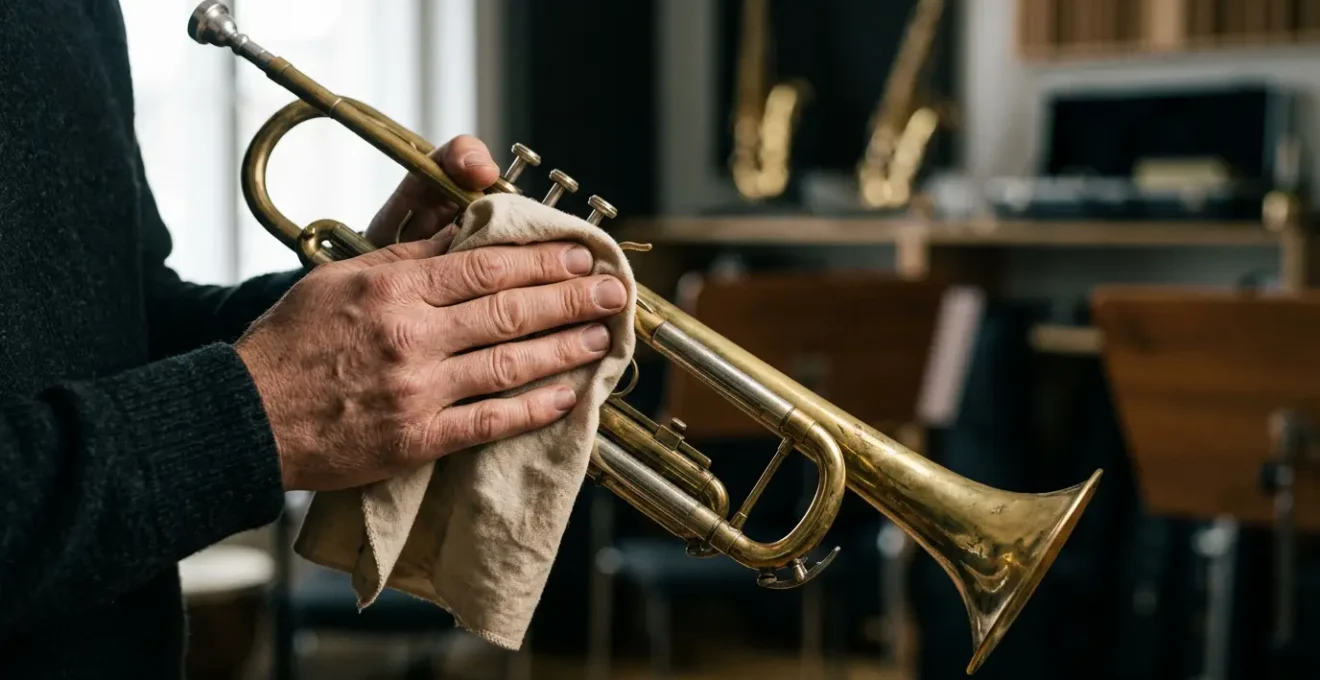
The final note has faded. Practice is over. The only thing standing between you and relaxation is your instrument, lying there, still warm. The temptation is immense: just put it in the case, close the lid, and deal with it tomorrow. Many musicians give in to this urge daily. The common advice is a vague chore: « you should clean your instrument. » This often conjures images of a time-consuming, 15-minute process involving polishes, cloths, and complicated steps—a significant barrier for anyone feeling tired or unmotivated.
But what if the most effective maintenance isn’t a long cleaning session, but a rapid, targeted intervention? The truth is, the most critical damage to your instrument begins in the first few minutes after you stop playing. It’s a battle against basic physics and chemistry. Moisture starts to saturate wood and pads, acidic oils from your fingers begin to corrode strings, and temperature changes cause materials to expand and contract. This isn’t about cleaning; it’s a damage-control protocol.
This article reframes post-practice care. It’s not a chore; it’s a 120-second, high-leverage routine designed to neutralize these immediate threats. We will break down the essential, science-backed actions for woodwind, brass, and string instruments. By focusing on the *why*—the material science behind the decay—you’ll see that these quick steps aren’t just good habits; they are the most powerful investment you can make in your instrument’s longevity and performance.
This guide details the crucial, non-negotiable steps that form a complete post-play protocol. Each section addresses a specific point of failure and provides a quick, effective solution to neutralize the threat before it can cause permanent damage.
Summary: The 2-Minute Instrument Care Protocol
- Moisture Rot: Why Leaving the Swab In Is Worse Than Not Swabbing
- Sticky Dust: Why You Must Wipe the Violin Strings Every Time
- Emptying the Water Key: Hygiene and Floor Protection
- Germs and Fingerprints: Sanitizing Keys Without Damaging Ivory
- The Roadie Wrap: How to Coil Cables So They Don’t Kink
- Wiping Down After Play: Doubling Your String Life
- Stuck Joints: Why Your Flute Won’t Fit Together in August
- Wood Movement: How Humidity and Temperature Kill Your Instrument
Moisture Rot: Why Leaving the Swab In Is Worse Than Not Swabbing
The single most destructive element for a woodwind instrument is trapped moisture. When you finish playing, the inside of your instrument is a warm, humid environment—the perfect breeding ground for mold and bacteria. The reflexive action is to run a swab through it and toss the swab in the case. This is a critical error. A damp swab left in a closed case creates a « microclimate of decay, » concentrating moisture against pads and wood. It’s worse than not swabbing at all because it guarantees 100% humidity for hours, accelerating pad rot and wood damage.
The science is clear and alarming. In a study of band instruments, research on musical instrument contamination found 442 different bacteria and 58 molds across tested sites. Your goal is not just to absorb moisture, but to remove it from the instrument’s environment entirely. The correct protocol is to swab the instrument, then immediately remove the swab from the case and let it air dry separately. This single action starves mold and bacteria of the water they need to survive.
The material of your swab also matters. Silk swabs offer the highest absorbency but dry slowly, making separate air-drying essential. Microfiber swabs are a practical choice for frequent players, as they dry quickly and are durable. Budget-friendly cotton swabs work but must be inspected for fraying, as lint can foul pads. The key is to see the swab not as a part of the instrument, but as a tool for exporting moisture out of the closed system of the case. Leaving it inside is like leaving a wet sponge in a toolbox—it guarantees rust and rot.
Sticky Dust: Why You Must Wipe the Violin Strings Every Time
For string players, the enemy is a nearly invisible but highly corrosive paste. When you play, microscopic particles of rosin become airborne and settle on your strings. Simultaneously, the natural oils and acids from your fingers are transferred to the strings. This combination creates a sticky, acidic compound that is far more destructive than « dust. » This corrosive paste tenaciously clings to the string’s metal windings. Left unchecked, it works its way between the fine gaps in the windings, where it traps moisture and eats away at the metal from the inside out.
The visual below shows the microscopic reality of a string’s surface. The difference between a clean string and one with rosin buildup is stark. The residue dulls the metal, dampens vibration, and initiates corrosion that deadens the string’s tone and shortens its life. This isn’t just an aesthetic issue; it’s a direct attack on your instrument’s sound production.

Wiping your strings after every session is a non-negotiable, high-leverage action. It physically removes the acidic agent before it can harden and bond to the metal. According to professional string instrument specialists, while strings should be replaced every 9-12 months, this simple daily wipe-down can extend their optimal tonal lifespan by an additional 3 to 6 months. It’s the highest return-on-investment action a string player can take, directly translating a 15-second habit into months of better tone and significant cost savings.
Emptying the Water Key: Hygiene and Floor Protection
For brass players, the « water » that collects in your instrument is a combination of condensation and saliva. While emptying the water key seems like a basic step, performing it correctly and consistently is a cornerstone of instrument hygiene and long-term mechanical health. The primary goal is to prevent the buildup of calcium and other mineral deposits. When this moisture is left to evaporate inside the instrument, it leaves behind mineral residue that can eventually seize valves and slides, leading to expensive professional repairs.
Beyond simply emptying the key, a quick daily health check is a crucial part of the disciplined tech’s routine. It takes only a few seconds but can alert you to developing problems long before they become critical. This protocol helps you monitor the health of your instrument’s seals and internal condition, ensuring small issues are caught before they escalate.
Daily Water Key Health Check Protocol
- Visual inspection: Clear condensation is normal. If you see cloudy, yellowish, or foul-smelling discharge, it indicates an internal buildup of calcification that requires professional chemical cleaning within the next 2-4 weeks.
- Tactile cork/pad test: A healthy water key seal should feel firm with a slight give. If the pad feels overly compressed, hard, or sticky when you press the lever, it needs replacement.
- Functional test: Water should evacuate in 1-2 seconds with the valve open. Slow drainage or residual moisture after emptying signals a partial blockage from mineral deposits on the valve seat.
- Preventive action: Make it a habit to empty your water key every 10-15 minutes during practice and always before storing the instrument. This prevents the formation of calcium deposits that can seize valves and slides.
This routine does more than just protect the instrument; it’s also a matter of basic hygiene and courtesy. Emptying your instrument onto a dedicated cloth or towel prevents slippery, unhygienic puddles on the floor, a sign of professionalism in any rehearsal or performance space. This simple protocol transforms a mundane task into a strategic act of preventative maintenance.
Germs and Fingerprints: Sanitizing Keys Without Damaging Ivory
The keys and surfaces of your instrument are high-touch areas, accumulating fingerprints, oils, and germs. While the urge to sanitize them with common household cleaners is strong, it’s often a disastrous mistake. Harsh chemicals, especially alcohol-based sanitizers, can wreak havoc on delicate materials like shellac pads, natural cork, and vintage ivory or plastic key-tops. They can dry out pads, causing them to shrink and leak, and can yellow or crack older materials. The disciplined approach is a two-stage process that cleans effectively without causing collateral damage.
The first stage is mechanical cleaning. Use a soft, natural-bristle brush (like a large makeup brush or a painter’s dusting brush) to gently whisk away dust and debris from around and under the keywork. This removes abrasive particles without scratching the finish. The second stage is chemical cleaning, but with the right chemical: a clean, dry microfiber cloth. For 99% of daily grime, the cloth alone is sufficient to lift oils and fingerprints from metal keys and the instrument body.
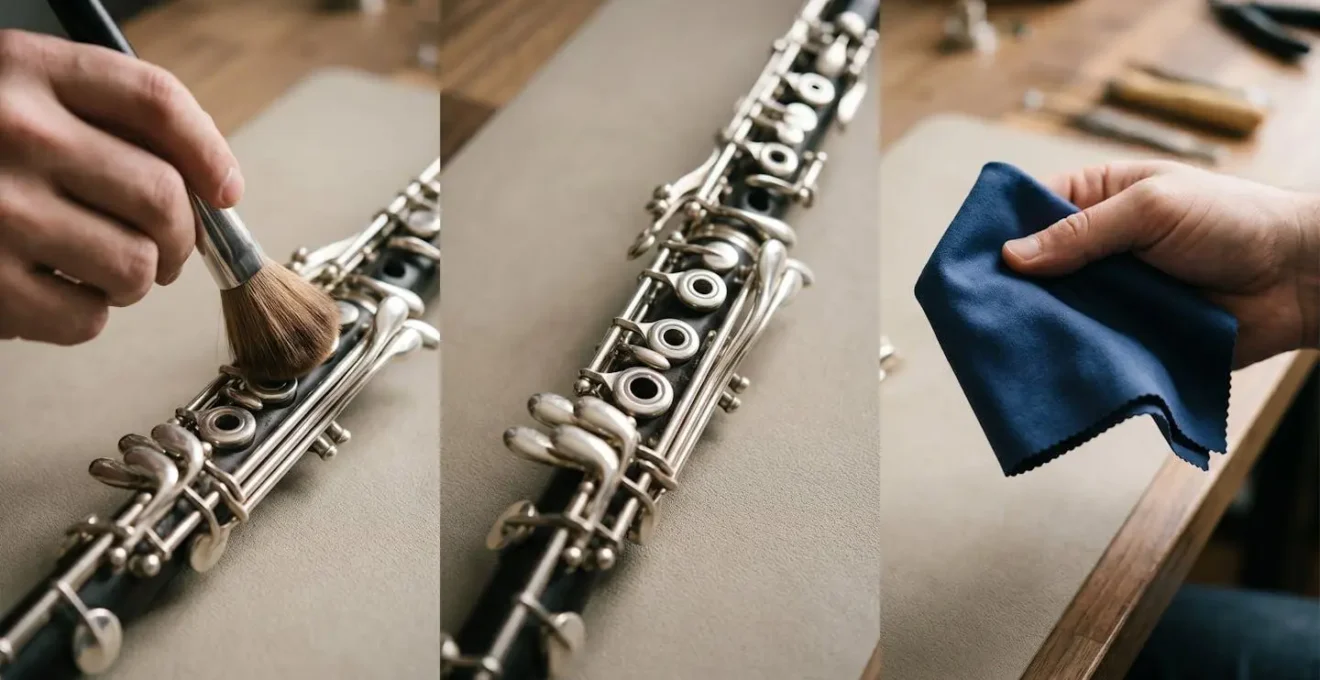
For situations requiring more sanitation, especially on vintage instruments with real ivory keys, the rule is to be extremely cautious. A slightly damp cloth with a tiny amount of mild, pH-neutral soap is the maximum to be used, and the surface should be dried immediately. Never apply liquid directly to the keys, as it can seep underneath and damage the underlying materials or glue. This two-stage brush-and-wipe ritual is a safe, effective protocol that maintains hygiene without compromising the integrity of your instrument’s most delicate components.
The Roadie Wrap: How to Coil Cables So They Don’t Kink
For any musician using electronics, from electric guitarists to vocalists, cable care is a crucial part of the post-session routine. The common mistake is to wrap a cable tightly around one’s elbow and hand, which twists the internal wires along their axis. When the cable is uncoiled, it retains this « memory, » leading to kinks, knots, and eventual internal breakage. This results in signal failure at the worst possible moment. The professional solution is the « over-under » or « roadie wrap » method. This technique takes the same amount of time but ensures the cable lays flat and kink-free every time.
This method works by alternating the direction of each coil, so that a clockwise twist in one loop is cancelled out by a counter-clockwise twist in the next. The net result is zero twist in the cable, preserving the life of the internal conductors. It’s a fundamental skill for equipment reliability.
- Step 1 – First loop (OVER): Hold the connector in your non-dominant hand. With your other hand, create a natural clockwise loop, letting the cable follow its inherent coil without forcing it. The loop should be about 12-18 inches in diameter.
- Step 2 – Second loop (UNDER): For the next loop, twist your wrist counter-clockwise as you bring the cable around. The cable should naturally form a loop that reverses the twist direction from the first step.
- Step 3 – Alternating pattern: Continue this « over-under-over-under » pattern until the entire cable is coiled. Each « under » loop perfectly counteracts the internal stress from each « over » loop.
- Step 4 – Health check integration: As you coil, run the cable through your fingers. You should feel for any lumps or stiff spots, or listen for crackling sounds, which indicate internal wire breakage. This allows you to identify and replace a failing cable before it fails during a performance.
- Step 5 – Storage: Use a velcro tie to secure the coil. Never wrap the cable’s end around the coil itself and plug it into itself, as this puts stress on the connectors and internal wires.
Mastering this simple technique is a rite of passage. It signals a shift from amateur habits to professional discipline, saving you money on replacement cables and protecting you from the nightmare of mid-show equipment failure.
Wiping Down After Play: Doubling Your String Life
We’ve discussed the corrosive nature of rosin and sweat on strings, but the *method* of wiping them down is just as important. A single, all-purpose cloth is a common but flawed approach. The rosin you wipe from the strings is abrasive. If you then use that same cloth to wipe the varnished body of your violin or guitar, you are essentially rubbing it with a fine-grain sandpaper. Over time, this causes micro-scratches that dull the instrument’s finish. The professional solution is the two-cloth system, a simple but highly effective protocol.
This system segregates the « dirty » work from the « polishing » work, ensuring that contaminants from one area are not transferred to another. It’s a core principle of disciplined instrument care.
- Cloth #1 (Dedicated String Cloth): Use a simple cotton or an old microfiber cloth exclusively for removing rosin from the strings. Use a « pinch-and-pull » motion, cleaning both the top and bottom of each string from the fingerboard to the bridge. This cloth will become dirty with rosin—this is its job.
- Cloth #2 (Body Polish Cloth): Keep a clean, fresh microfiber cloth reserved only for the instrument’s body and varnish. After cleaning the strings with Cloth #1, use this second cloth to gently wipe away fingerprints and oils from the wood surfaces.
Certain « danger zones » require extra attention as they are hotspots for acidic sweat that can damage the finish. These include the chinrest bracket on a violin or viola, the back of a guitar neck where your thumb rests, the point where your forearm contacts an acoustic guitar’s body, and the machine heads on a bass. The key is to perform this wipe-down immediately after every playing session, before the rosin and oils have a chance to harden and bond with the instrument’s surfaces. Once hardened, this corrosive film can no longer be fully removed.
Stuck Joints: Why Your Flute Won’t Fit Together in August
One of the most common frustrations for woodwind players, especially in warmer months, is a joint that suddenly refuses to fit together or, worse, gets stuck. This is rarely due to a defect; it’s basic physics. Metal expands when it gets hot. The male part of a tenon joint (the part that inserts) and the female part (the part that receives) are made of different masses of metal and may be at slightly different temperatures, causing them to expand or contract at different rates. Forcing them together can bend keys, crack the socket, or warp the tenon, resulting in a costly repair.
The problem is exacerbated by microscopic dust and finger oils that create friction. The immediate, panicked reaction is to apply more force, which is the worst possible response. A disciplined musician has an emergency protocol for this situation that relies on patience, not power.
- DO NOT: Never force stuck joints. Do not use pliers, wrenches, or rubber grips. These tools concentrate pressure and will dent or bend the metal, turning a temporary problem into a permanent one.
- DO – Immediate action: If joints are stuck, separate the pieces if possible and place them at least 6 feet apart in the same room for 15-20 minutes. This allows both parts to acclimate and reach an identical ambient temperature.
- DO – Gentle retry: After the acclimation period, hold the instrument body firmly (avoiding keys and posts) and use a gentle twisting motion while pulling or pushing. If thermal equilibrium has been reached, the joint should release with minimal pressure.
- Prevention habit: The best solution is prevention. Wipe both the male and female surfaces of the tenon with a clean, dry, lint-free cloth every single time you assemble and disassemble the instrument. This removes the oils and dust that cause friction.
- If still stuck: If the joint is still stuck after 20 minutes, place it under lukewarm (never hot) running water for 30 seconds. This can create a slight differential expansion to help release it. Dry thoroughly and retry. If this fails, take it to a professional technician immediately.
Understanding the principle of thermal expansion transforms this frustrating experience into a solvable problem. It’s a reminder that working with the laws of material science, not against them, is the key to instrument care.
Key Takeaways
- The most critical damage to an instrument happens in the minutes after playing, not over weeks or months.
- A rapid, consistent routine targeting moisture, acid, and temperature is more effective than infrequent deep cleans.
- The goal is to return the instrument to a neutral, stable « state of equilibrium » as quickly as possible.
Wood Movement: How Humidity and Temperature Kill Your Instrument
The final, and perhaps most critical, element of the post-practice protocol is returning your instrument to a safe, stable environment. For wooden instruments, the twin enemies are humidity and temperature. Wood is a hygroscopic material, meaning it absorbs and releases moisture from the air, causing it to swell and shrink. Rapid or extreme changes in humidity and temperature are catastrophic, leading to cracked tops, failed glue joints, and warped necks. According to research on instrument material preservation, maintaining humidity between 40-60% is the scientifically proven range to prevent these issues.
Your instrument case is not just for transport; it’s a micro-environment buffer. However, where you store that case is paramount. The following are the most common environmental « killers » that every musician must avoid:
- Car storage: The absolute worst place. Interior temperatures can swing dramatically, causing rapid expansion-contraction cycles that crack wood and fail glue joints. Never leave an instrument in a vehicle.
- HVAC vent proximity: Storing an instrument near radiators, AC units, or forced-air vents creates a localized zone of extreme humidity and temperature swings. Keep cases at least 10 feet away from any heating or cooling source.
- Exterior wall storage: Outside walls are subject to greater temperature fluctuations than interior walls. Always store instruments against interior walls of your home.
- Basements/attics: These spaces are notorious for extreme humidity (basements) and temperature swings (attics), making them the worst possible long-term storage locations.
- Flying without precautions: The cargo hold of an airplane is an environment of extreme cold and low humidity. Always carry your instrument on board if possible, and if you can’t, use in-case humidification and allow the case to acclimate for hours before opening it upon arrival.
The image below shows the ideal: an instrument resting safely in its case, protected from the outside world. This is the goal of your two-minute routine: to clean, neutralize, and return your instrument to its sanctuary, where it can rest in a state of equilibrium, ready for the next time you play.
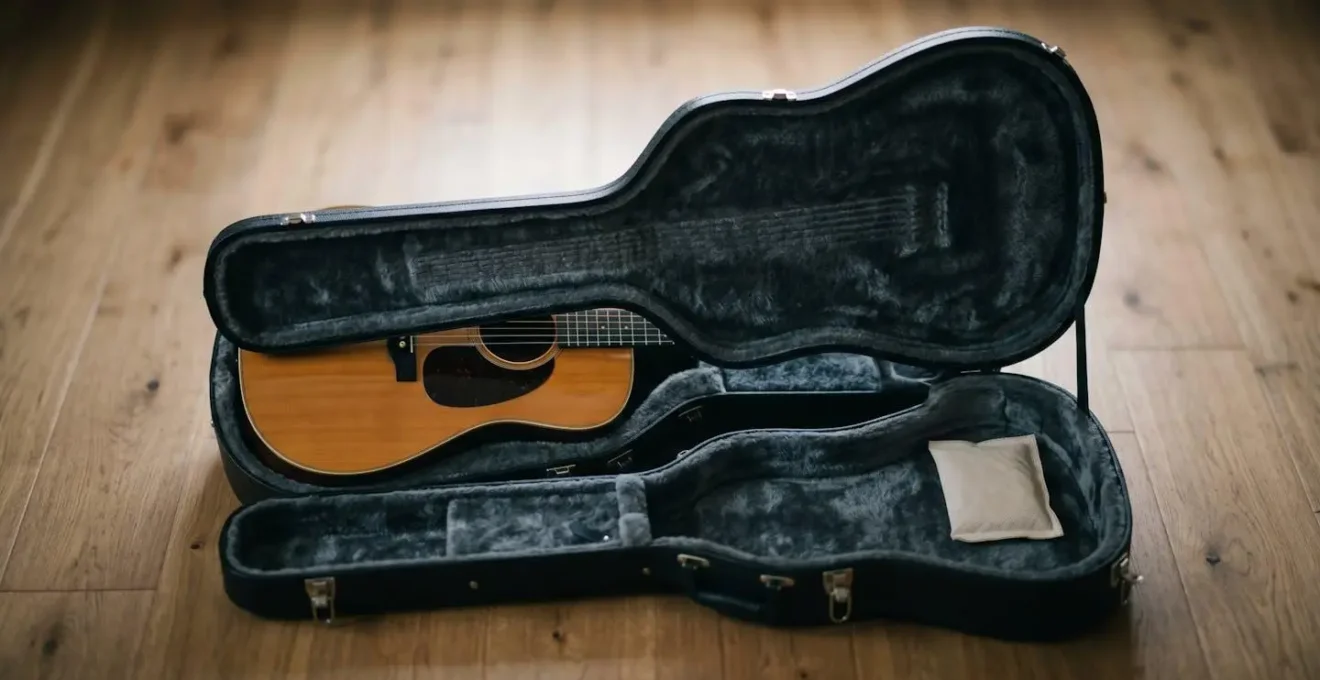
Using in-case humidity control packs (like Boveda or Humidipak) is a powerful way to buffer against environmental changes, but it is not a substitute for smart storage. Your final action after every practice should be to place the instrument back in its case and store that case in the most stable corner of your home, bringing your damage-control protocol to a successful close.
Integrate this two-minute protocol into your daily habits. Your instrument’s longevity depends not on long, occasional cleanings, but on this immediate, consistent damage control.