Much of the common wisdom about instrument ‘cleaning’ is a recipe for irreversible damage, turning well-intentioned care into a costly mistake.
- Household products like alcohol-based sanitizers can instantly dissolve delicate finishes like shellac, while popular « lemon oil » can actually accelerate fret corrosion.
- The wrong type of cloth introduces micro-abrasions, permanently dulling high-gloss surfaces, and trapped moisture can lead to biological hazards inside your instrument.
Recommendation: Adopt a preservation mindset. Understand the material science of your instrument and use specific, chemistry-aware protocols for cleaning and maintenance to ensure its longevity and value.
For musicians, an instrument is more than an object; it is an extension of their voice. The desire to care for it is natural, leading to rituals of wiping, polishing, and storing. Yet, lurking in many of these well-intentioned routines is a destructive force: household chemistry. Many musicians, in an effort to keep their instruments pristine, are inadvertently causing microscopic damage that accumulates over time, ruining finishes, corroding metal, and diminishing the instrument’s value and lifespan. They see a smudge and reach for a common cleaner, unaware they are applying a chemical solvent to a delicate, centuries-old finish technology.
The common advice is often dangerously simplistic: « use a soft cloth, » « oil the wood, » « give it a good clean. » This guide rejects such platitudes. We will not be « cleaning » an instrument; we will be engaging in material preservation. Adopting the meticulous mindset of a museum conservator, we will explore the chemical and physical interactions between your instrument’s materials and the substances they encounter. This is not about simple hygiene; it’s about understanding the science of why hand sanitizer melts a vintage guitar’s finish, why the wrong cloth is worse than no cloth, and how a damp swab left in a case can cultivate a genuine health hazard. By understanding the ‘why’ behind the protocols, you can move beyond generic tips and implement a care routine that truly protects and preserves your musical partner for decades to come.
This article provides a detailed, science-based approach to instrument maintenance. Explore the sections below to learn the specific protocols for preserving your instrument’s integrity, from controlled brass descaling to understanding the volatile chemistry of fine finishes.
Summary: A Conservator’s Guide to Proper Instrument Cleaning and Preservation
- The Bathtub Dip: How to Descale a Trumpet Safely
- Lemon Oil Myths: When to Oil and When to Stop
- Alcohol vs Shellac: Why Hand Sanitizer Melts French Polish
- Scratch Prevention: Choosing the Right Cloth for High Gloss
- Wiping Down After Play: Doubling Your String Life
- Ivory vs Plastic: How to Whiten Yellowed Keys Without Damage
- Moisture Rot: Why Leaving the Swab In Is Worse Than Not Swabbing
- The 2-Minute Post-Practice Routine That Saves Your Instrument
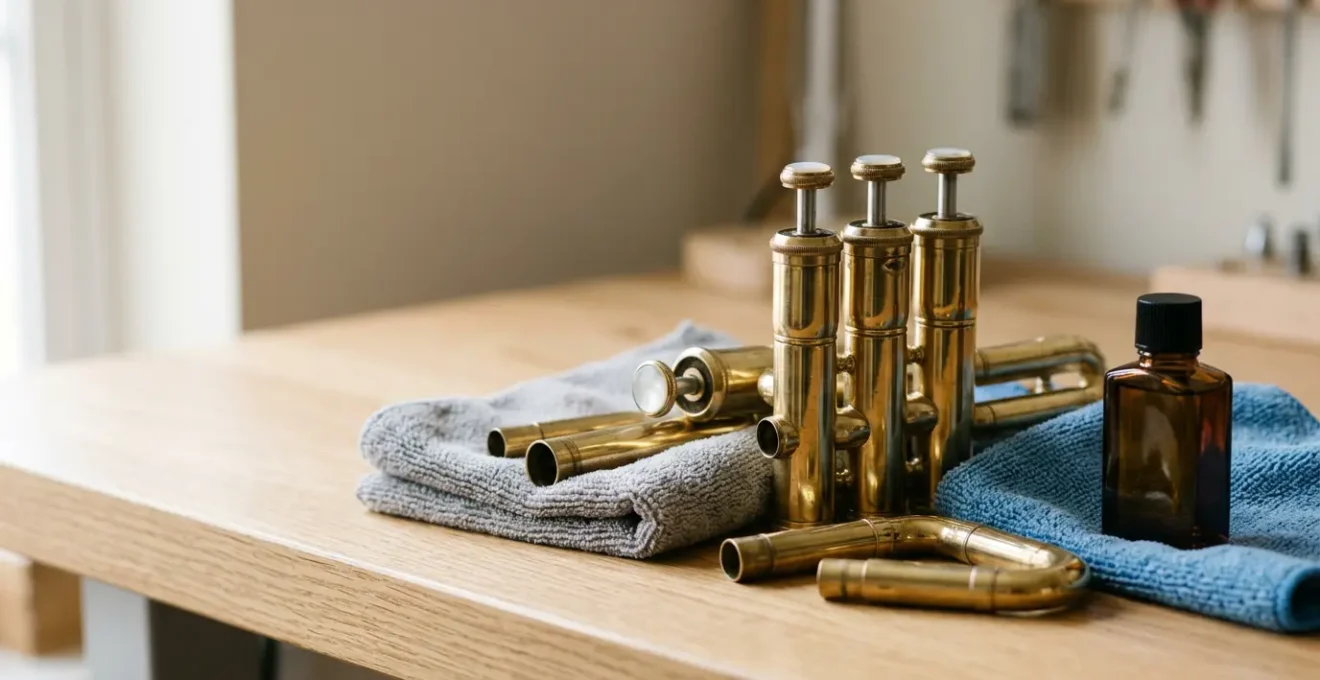
The Bathtub Dip: How to Descale a Trumpet Safely
The idea of submerging a brass instrument can be terrifying, evoking images of rust and damage. However, a periodic, controlled bath is a necessary protocol for internal decontamination. The primary threat isn’t water, but the buildup from within. As one professional trumpet technician explains, the danger is « red rot is where the acids in our saliva eat away at the raw brass in the lead pipe. » This corrosive process, along with mineral deposits from saliva, can impede airflow and damage the instrument’s core tubing. A « bathtub dip » is not a casual cleaning; it is a descaling procedure.
The protocol requires careful preparation to avoid thermal shock or surface damage. Hot water must be avoided, as it can damage the lacquer finish. A towel lining the tub prevents scratches. The choice of solvent is critical: a mild, non-detergent dish soap provides the necessary surfactant properties to break down grime without leaving a residue or reacting with the brass. Harsh detergents must be avoided. The process involves a full disassembly, a soak to loosen deposits, a thorough scrubbing of all internal pathways with specialized brushes, and a comprehensive rinse. This is less a « bath » and more a minor surgical cleaning.
- Disassemble: Remove all tuning slides and valve caps. Carefully remove valves, noting their number and orientation to prevent incorrect reinstallation.
- Prepare Bath: Fill the tub with lukewarm water. Place a towel on the bottom to prevent scratching the finish.
- Add Soap: Use a mild dish soap. Avoid harsh detergents.
- Soak: Allow parts to soak for 20-30 minutes. Keep valve felts dry by not fully submerging the valves.
- Brush Interior: Use a flexible snake brush and valve casing brush to scrub the inside of all tubing until water runs clean.
- Rinse Thoroughly: Rinse all parts with clean, cool water to remove all soap residue.
- Dry Completely: Air-dry all components on a towel. Ensure no water remains inside the tubing before reassembly.
- Lubricate: Apply fresh valve oil and slide grease during reassembly.
Lemon Oil Myths: When to Oil and When to Stop
One of the most persistent and damaging myths in instrument care is the liberal application of « lemon oil » to guitar fretboards. The term itself is misleading; commercial fretboard « lemon oil » is typically mineral oil with a lemon scent and colorant, not pure citrus oil. The danger arises when musicians, believing the hype, use actual lemon-based household cleaners or over-apply the product. Martin Guitars issues a stark warning: « The acids in lemon oil break down the finish of your guitar … speed the corrosion of the frets, and decrease the life of your strings. » This is a chemical assault on three different materials: the finish, the metal frets, and the string alloy.
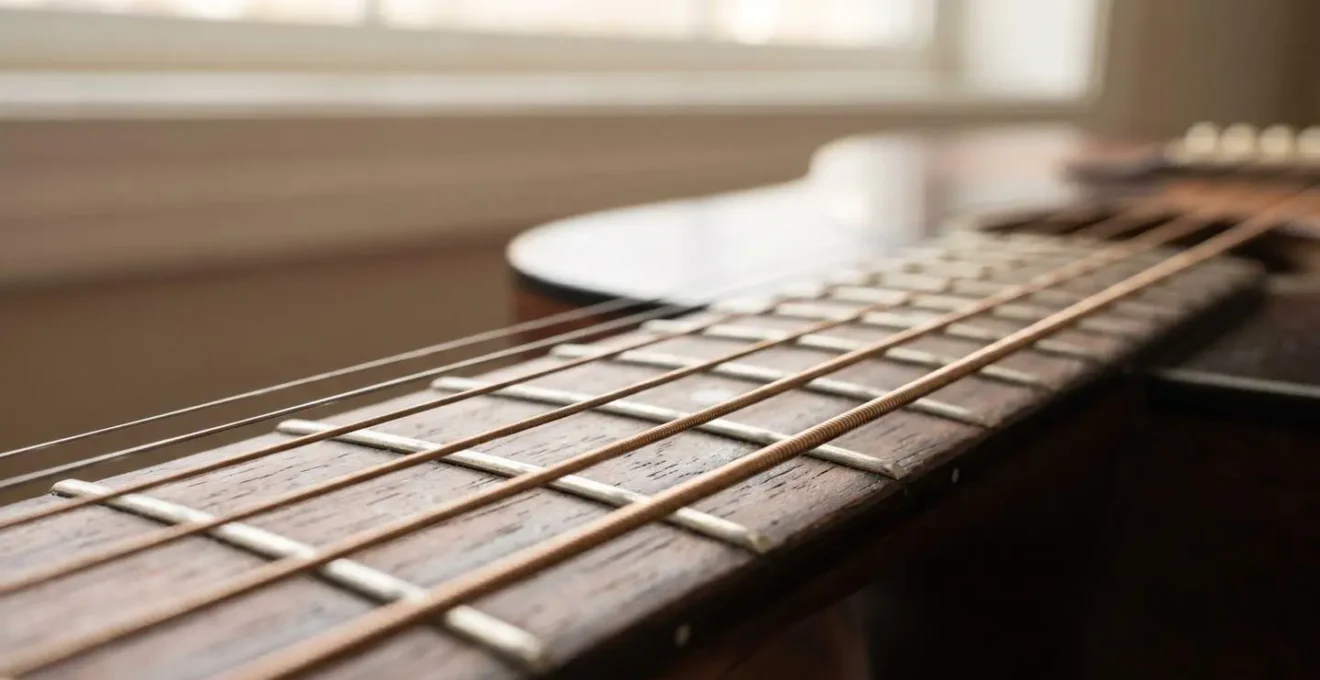
The purpose of oiling a fretboard is not to « feed » the wood, but to lightly condition it and prevent it from drying out, especially for unfinished woods like rosewood and ebony. A dry fretboard can shrink and cause fret ends to protrude. However, the wood is not a sponge. Over-oiling saturates the pores, can loosen fret glue, and creates a sticky, grime-attracting surface. A conservator’s approach is one of extreme moderation. For most environments, conditioning is needed very rarely. According to professional luthier guidelines, fretboards may need oiling only once or twice per year in normal humidity; up to three times per year in arid climates. The correct procedure is to apply a tiny amount to a cloth, wipe the board, and then immediately wipe all excess off with a clean, dry cloth. The goal is a clean, smooth surface, not a visibly oily one.

As this macro image shows, the wood grain has a natural, porous texture. The goal of conditioning is to replenish moisture lost in very dry climates, not to clog these pores with excess oil, which can trap dirt and deaden the wood’s resonant properties. The key is minimal application, only when necessary.
Alcohol vs Shellac: Why Hand Sanitizer Melts French Polish
There is no faster way to destroy the finish of a fine classical guitar or vintage violin than with alcohol. Many of the most beautiful and acoustically transparent finishes, particularly French polish, are shellac-based. Shellac is a natural resin dissolved in alcohol to create the varnish. This means that alcohol is its direct solvent. Applying an alcohol-based product, such as hand sanitizer, perfume, or certain cleaning wipes, to a shellac finish is chemically equivalent to applying paint stripper. The effect is immediate and devastating, causing the finish to soften, cloud, or liquefy on contact.
Case Study: French Polish Vulnerability to Alcohol-Based Products
French polish finishes, prized on classical guitars and violins, are created by applying shellac resin by hand. This traditional finish is exceptionally thin, contributing to the instrument’s resonance, but it is also exceptionally fragile. A study of these finishes shows their particular sensitivity to alcohol. When common alcohol-based products like hand sanitizers or perfumes make contact, they immediately begin to dissolve the shellac. This chemical reaction creates cloudy white marks or can strip the finish entirely. While the vulnerability is high, one advantage of shellac is its repairability; a skilled luthier can often spot-repair the damage using the same French polishing techniques, a process not possible with more modern, harder finishes like polyurethane.
The only defense is absolute prevention. Musicians who own or handle instruments with shellac or other sensitive finishes (like nitrocellulose) must be vigilant. Hands should be clean and dry, free of any sanitizer, lotion, or perfume. If a spill occurs, the response must be immediate, following a strict protocol to minimize damage. Do not rub. Blot gently with a clean, dry, lint-free cloth to lift the liquid off the surface. Any rubbing will spread the solvent and abrade the softened finish, making the damage far worse. The instrument should then be left to air-dry and assessed by a professional luthier. Attempting a DIY repair often leads to more extensive and costly restoration work.
Scratch Prevention: Choosing the Right Cloth for High Gloss
The advice to « use a soft cloth » is dangerously incomplete. The softness of a cloth is not its most important quality; its fiber structure is. The wrong cloth can act like fine-grit sandpaper, inflicting a network of micro-abrasions on a high-gloss finish. Over time, these tiny scratches accumulate, scattering light and permanently dulling the instrument’s mirror-like shine. Common household items like paper towels are a primary culprit. Their wood pulp fibers are coarse and can contain abrasive particles, making them entirely unsuitable for any finished surface.
An old cotton t-shirt, another popular choice, is also a significant risk. While the cotton fibers themselves may be soft, the woven structure can trap and drag abrasive dust and dirt particles across the finish. A proper polishing cloth is not just a piece of fabric; it’s an engineering tool designed for a specific task. Premium microfiber cloths are the gold standard for a reason. Their fibers are split into ultra-fine strands that are far thinner than a human hair. This structure creates a vast surface area that actively lifts and traps dust, oils, and particulate matter away from the surface, rather than just pushing them around. This lifting action is what prevents scratching.
The following table provides a material science breakdown of common cloth types, clarifying their appropriate use in instrument preservation based on their risk of causing surface damage.
| Cloth Type | Fiber Structure | Scratch Risk | Best Use | Avoid For |
|---|---|---|---|---|
| Microfiber (Premium) | Ultra-fine split fibers lift and trap particles | Very Low | Daily wiping, polishing high-gloss finishes, silver polish application | None (safe for all finishes) |
| Cotton T-Shirt (Old) | Woven natural fibers trap abrasive dust | Medium-High | General workshop tasks | High-gloss finishes, lacquer, silver plate |
| Paper Towels | Wood pulp with embedded particles | High | Cleaning grease from slides only | All finished surfaces – can scratch delicate finishes and leave lint |
| Cotton Flannel (Purpose-made) | Soft woven natural cotton | Low-Medium | Brass polishing with compounds | Dry dusting (can trap particles) |
Wiping Down After Play: Doubling Your String Life
For players of stringed instruments, the most frequent and damaging chemical assault comes from their own bodies. Human sweat is a complex, corrosive cocktail of water, salts (chlorides), oils, and acids. When left on metal strings, this mixture initiates an aggressive oxidation process. The chlorides attack the protective outer layer of the metal alloy, while the moisture and acids accelerate the corrosion, or rust. This not only makes the strings feel gritty and unpleasant to play but also fundamentally changes their mass and flexibility, resulting in a dead, lifeless tone and poor intonation.
Simply wiping down strings after every single use can, without exaggeration, double their playable life. This simple act of mechanical cleaning removes the corrosive agents before they have time to react with the metal. The technique is as important as the act itself. A quick, lazy wipe is insufficient. The most effective method is to take a clean, dry microfiber cloth, pinch a single string between your thumb and forefinger, and slide the cloth along the entire length of the string, from the nut to the bridge. It is crucial to clean both the top surface and, most importantly, the underside of the string, where most of the residue collects. Repeat for each string.
The subtle moisture and oils left after a practice session, as visualized here, are the catalyst for corrosion. Removing this film immediately is the single most effective action a player can take to preserve the tone, feel, and lifespan of their strings, saving money and time on replacements.
Ivory vs Plastic: How to Whiten Yellowed Keys Without Damage
The yellowing of piano keys is a common sign of age, but treating it requires a precise diagnosis of the material. Attempting to « whiten » keys without knowing if they are ivory or plastic can lead to catastrophic, irreversible damage. Vintage pianos often feature keys made from ivory, a porous, organic material derived from elephant tusks. Modern pianos, and many older ones that have been refurbished, use various types of plastic. These two materials react to chemicals in starkly different ways, and a method safe for one can destroy the other.
Ivory’s porous nature means it can absorb substances, but it is also extremely sensitive to chemicals that can dry it out or break down its organic structure. A common DIY suggestion found online is to use hydrogen peroxide to bleach the keys. A professional piano technician warns against this, stating, « Hydrogen peroxide, a common DIY suggestion, can make ivory brittle and can unpredictably mottle or damage older plastics over time. » For ivory, this can lead to cracking and delamination. For older, unstable plastics, it can cause splotchy discoloration or make the material even more yellow and brittle. The safest method for cleaning genuine ivory is to use a soft, lint-free cloth very lightly dampened with clean water and a drop of mild soap, then immediately dried. No solvents should ever be used.
For modern plastic keys, cleaning is simpler. A cloth dampened with a mild soap and water solution is usually effective. For stubborn grime, a specialized key-cleaning product is the safest bet. The absolute rule is to test any cleaning solution on a small, inconspicuous part of a single key first. Given the high stakes and the difficulty in distinguishing old, high-quality plastics from real ivory, the most prudent course of action for a yellowed keyboard of unknown origin is to consult a qualified piano technician. Their expertise in material identification is the first and most critical step in any restoration attempt.
Moisture Rot: Why Leaving the Swab In Is Worse Than Not Swabbing
For woodwind and brass players, removing moisture after playing is a non-negotiable part of instrument hygiene. However, a common and dangerous mistake is to run a swab through the instrument and then leave the damp swab inside the case with it. This action is worse than not swabbing at all. It transforms the enclosed, dark space of the instrument case into a perfect incubator for mold, fungi, and bacteria. The swab, now saturated with moisture and organic matter from the player’s breath, becomes a petri dish, cultivating a colony of microorganisms that will then be reintroduced into the instrument at the next practice session. This can lead to pad rot in woodwinds, corrosion in brass, and foul odors.
The health consequences can be severe. These cultivated pathogens can be inhaled by the player, leading to respiratory issues. Professional instrument care guidelines recommend cleaning brass instruments on a monthly basis to prevent buildup of yeast and harmful pathogens, but daily moisture management is the first line of defense. The proper protocol is to swab the instrument thoroughly, and then remove the swab from the case to air-dry separately. The instrument itself should also be allowed to air-dry for a few minutes before being cased. Leaving the case open for 10-15 minutes after returning the instrument allows any residual moisture to evaporate.
Case Study: « Bagpipe Lung » and Instrument Moisture Contamination
In a dramatic illustration of this danger, a documented case at Manchester’s Wythenshawe Hospital recorded what became known as ‘bagpipe lung.’ A 61-year-old patient suffered a fatal hypersensitivity pneumonitis, a severe allergic reaction in the lungs. The cause was traced to a toxic brew of mold and fungi lurking inside his bagpipes. Medical professionals found that these pathogens developed due to the constant moisture accumulation in an instrument that was not being properly dried and cleaned. Similar cases have been documented with saxophone, trumpet, and trombone players. These tragic outcomes are entirely preventable through strict adherence to drying and cleaning protocols, proving that instrument hygiene is a matter of personal health, not just maintenance.
Key Takeaways
- Instrument finishes are chemically fragile; common household products are often potent solvents that cause irreversible damage.
- Moisture is the primary biological enemy, creating incubator conditions for harmful mold and fungi if not managed with strict drying protocols.
- The right tool for the job is a scientific necessity; a high-quality microfiber cloth prevents the micro-abrasions that permanently dull a finish.
The 2-Minute Post-Practice Routine That Saves Your Instrument
After exploring the myriad chemical, physical, and biological threats to our instruments, the solution can feel overwhelming. Yet, the vast majority of preventable damage can be avoided by implementing a simple, universal post-practice routine. This is not about deep cleaning; it is a two-minute ritual of preservation that stabilizes the instrument and neutralizes the most immediate threats of moisture and corrosive residue. The financial incentive is clear: preventing a problem is far more economical than fixing one, with repair costs easily running into the hundreds of dollars. As data on professional repair pricing shows, costs can range from $65-$250 for common repairs and over $600 for complex repairs.
This routine is an investment that pays for itself many times over. As the professionals at Second Wind Instrument Repair note, « By investing in routine maintenance, you can potentially save money on extensive repairs in the long run. » The goal of this ritual is to return the instrument to a state of stasis, clean and dry, ready for its next use. It addresses the most vulnerable points: moisture in the bore, corrosive sweat on strings and keys, and proper environmental storage. It takes less time than packing up an amplifier or a music stand, yet it is the single most important action you can take to ensure the long-term health and value of your instrument.
Your Action Plan: The Universal 2-Minute Post-Practice Care Checklist
- Minute 1 – Remove Moisture: For wind instruments, swab the interior thoroughly and remove the swab from the case. For strings, wipe down all strings with a microfiber cloth using a pinch-and-slide technique.
- Minute 1 (continued) – Clean Contact Points: With the same cloth, wipe the fingerboard/fretboard, valve casings, key mechanisms, or any other area where your hands made contact with the instrument.
- Minute 2 – Inspect for Issues: Perform a quick visual check for loose parts, developing cracks, sticky valves, frayed bow hair, or bridge alignment problems. Catching issues early is key.
- Minute 2 (continued) – Proper Storage: Return the instrument to its case only when it is dry. If you’re in a humid environment, consider leaving the case lid open for 10-15 minutes to allow residual moisture to evaporate.
- Weekly Addition: On a weekly basis, perform one small additional task appropriate for your instrument, such as applying valve oil (brass), rosining the bow (strings), or oiling key mechanisms (woodwinds).
This disciplined, two-minute habit transforms maintenance from a dreaded chore into a mindful ritual that concludes every musical session. It is the final, respectful gesture you can offer your musical partner, ensuring it remains in peak condition.