An iPad becomes a professional music tool not through the apps you install, but through the rigorous workflows and reliability checks you implement.
- Success depends on building a trustworthy digital system, from reliable page-turning to stable backing track playback.
- Understanding the digital signal chain, including cable quality and gain staging, is as crucial as knowing your instrument.
Recommendation: Shift your focus from simply downloading apps to meticulously building and testing a complete, stage-ready digital workflow.
The promise of using an iPad for music is intoxicating: a single, glowing pane of glass replacing bulky binders of sheet music, complex recording gear, and entire pedalboards. For any musician wanting to digitize their practice and performance, the App Store appears to be a treasure chest of solutions. We’re often told to simply download an app like ForScore for sheet music, GarageBand for ideas, and maybe grab a Bluetooth pedal for convenience. This is where most advice stops, and where most problems begin.
The reality is that a truly professional digital music setup isn’t built on a collection of apps, but on a foundation of system reliability and intelligent workflow. The difference between an amateur setup and a pro rig is not what happens when things go right, but what happens when they go wrong. A mid-song notification, a dead pedal battery, or a blast of digital noise can derail a performance instantly. The real challenge isn’t finding apps; it’s integrating them into a dependable, bulletproof system that you can trust under pressure.
This guide moves beyond the typical app recommendations. We will focus on the critical workflows and reliability checks that transform your tablet from a fragile consumer device into a robust professional tool. We will dissect the nuances of building a digital gig book, ensuring your backing tracks are fail-safe, capturing ideas efficiently, and understanding why even a high-end instrument can sound terrible through a poorly managed digital signal chain. It’s time to build a system, not just a folder of apps.
To navigate this transformation, this article breaks down the essential components of a professional iPad-based music rig. Each section addresses a specific workflow, providing actionable advice to ensure stability, efficiency, and quality at every step of your digital journey.
Summary: Your Guide to a Professional iPad Music Rig
- Bluetooth Pedals: Keeping Hands on the Instrument While Reading
- ForScore vs Piascore: Organizing Your Gig Book Digitally
- The Gig Rig: Running Tracks from a Phone Reliability
- Voice Memos vs DAWs: capturing Ideas Quickly
- Learning Fast Solos: Apps that Change Speed Without Pitch Shift
- Sibelius vs Dorico: Choosing the Right Notation Software
- Tone Suck: Why Long Cheap Cables Kill High Frequencies
- Cables and Amps: Why Your £2000 Guitar Sounds Like Mud
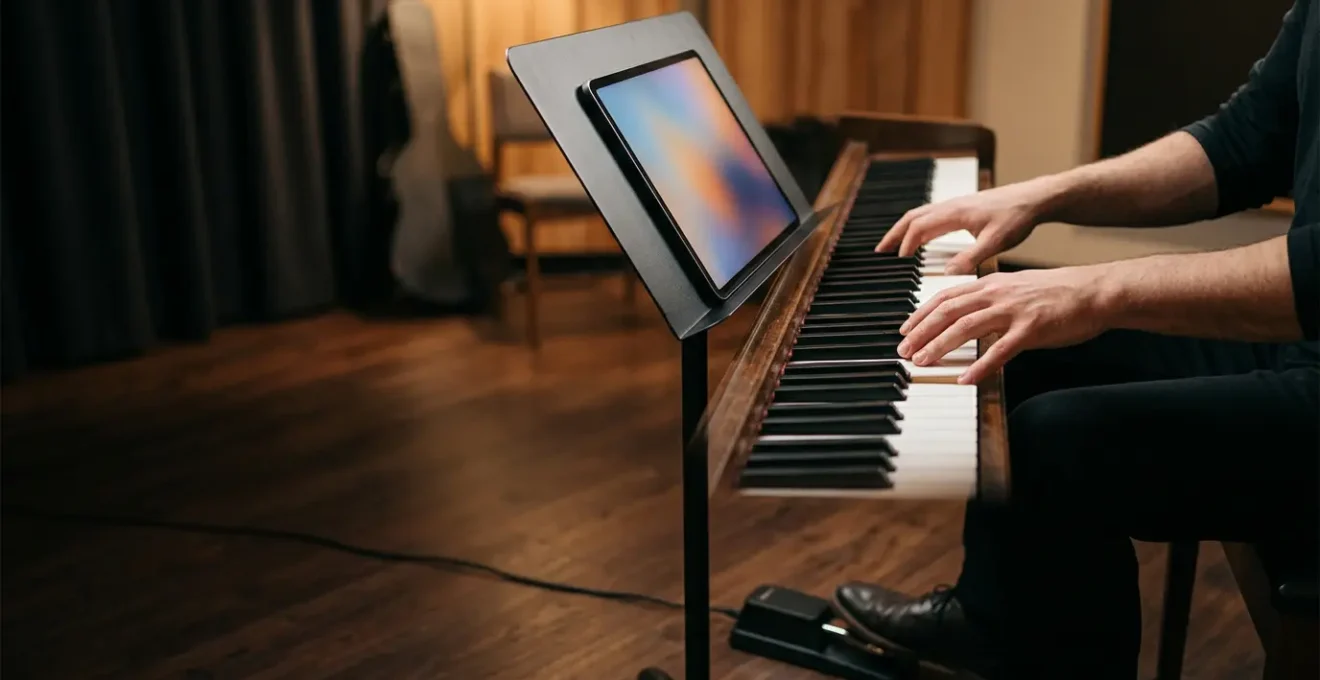
Bluetooth Pedals: Keeping Hands on the Instrument While Reading
A Bluetooth page-turning pedal is the first step toward a hands-free digital music stand, but its true value lies in its reliability. The goal isn’t just to turn a page, but to do so silently, instantly, and without fail, every single time. Brands like AirTurn and PageFlip are popular for a reason: they are built for the stage. For instance, professional testing confirms battery life can last 150-200+ hours on a single charge for models like the AirTurn DUO, eliminating one major point of failure. However, owning the pedal is only half the battle; integrating it into a performance-ready workflow is what matters.
This means developing a non-negotiable pre-performance checklist. It starts with ensuring batteries are fresh or fully charged. More importantly, it involves testing the Bluetooth pairing well before you hit the stage, especially in venues with heavy wireless traffic where multiple devices could cause interference. You must confirm your pedal’s unique ID is connected to your iPad. Ergonomics also play a key role in reliability. A classical guitarist’s pedal placement will differ from a standing vocalist’s, and finding the natural, no-look position prevents mis-stomps. Finally, a soundcheck isn’t just for audio; it’s your chance to test the pedal’s response time and confirm there is no perceivable latency between your command and the page turn. This is your performance fail-safe.
ForScore vs Piascore: Organizing Your Gig Book Digitally
Once your pages turn reliably, the next challenge is organizing them. ForScore and Piascore are the two dominant forces in the sheet music reader world, but they represent fundamentally different philosophies. Piascore is free and offers a built-in gateway to the massive IMSLP public domain library, making it appealing for casual users or students. However, its reliance on converting PDFs to image files results in pixelation when zooming, and its library organization is limited to basic folders. This can quickly become unmanageable for a working musician with a large repertoire.
ForScore, despite its one-time cost, is the professional standard for a reason: it’s built for scale and meticulous organization. It uses vector-based PDF rendering, ensuring scores remain crystal clear at any zoom level. Its true power, however, lies in its metadata. As noted in professional comparisons, you can tag scores with genres, keywords, ratings, duration, and even create bookmarks for specific sections (e.g., « verse 2 to end »). This allows for the instant creation of setlists for different gigs without duplicating files. The app also supports multiple annotation layers, so a conductor can have different markings than an individual player, all on the same file. This deep feature set is what enables a seamless workflow integration for everything from a solo gig to a full orchestra.
As an example of this professional workflow, many orchestra musicians use ForScore’s ‘Darkroom’ feature to quickly scan new scores. They then apply OCR for searchable metadata and batch-edit entire sets of music with consistent tags for key, duration, and difficulty. This level of organization is the difference between a simple digital sheet collection and a powerful, searchable performance library.
| Feature | ForScore | Piascore |
|---|---|---|
| Price | $14.99 one-time purchase | Free (with in-app purchases) |
| Annotation Layers | Multiple layers for different contexts (conductor, performance, practice) | Single layer only |
| PDF Rendering Quality | Vector-based, smooth zoom | Converts PDFs to images, pixelated when zoomed |
| IMSLP Integration | Not available – requires manual import via cloud services | Built-in direct access to IMSLP public domain library |
| Library Organization | Advanced metadata: genres, keywords, labels, ratings, duration, key, bookmarks | Limited folder organization |
The Gig Rig: Running Tracks from a Phone Reliability
Using a phone or tablet for backing tracks is the modern standard, but it’s also where system reliability is most critical. As one live sound engineer on the Gearspace forums bluntly put it, « It will work, until it doesn’t. Or until you’re in a rush and forget to rig silent/airplane mode for performance. » This perfectly captures the central challenge: consumer devices are not inherently built for the stage. Making them stage-ready requires a strict, uncompromising pre-show digital checklist.
This checklist is non-negotiable. First, Airplane Mode is mandatory to block all calls and notifications, but remember that clock alarms and calendar reminders can still break through, so they must be disabled separately. Second, close all background apps to dedicate the device’s CPU entirely to audio playback. Third, tracks must be stored locally on the device—never stream from the cloud during a live show. Fourth, the device must be connected to a power source, with the cable secured with gaffer tape to prevent accidental disconnection. The most crucial step, however, is to bypass the headphone jack entirely. A dedicated mobile audio interface with balanced outputs is essential to avoid the ground loop hum common with consumer outputs and to deliver a professional-grade signal to the soundboard.
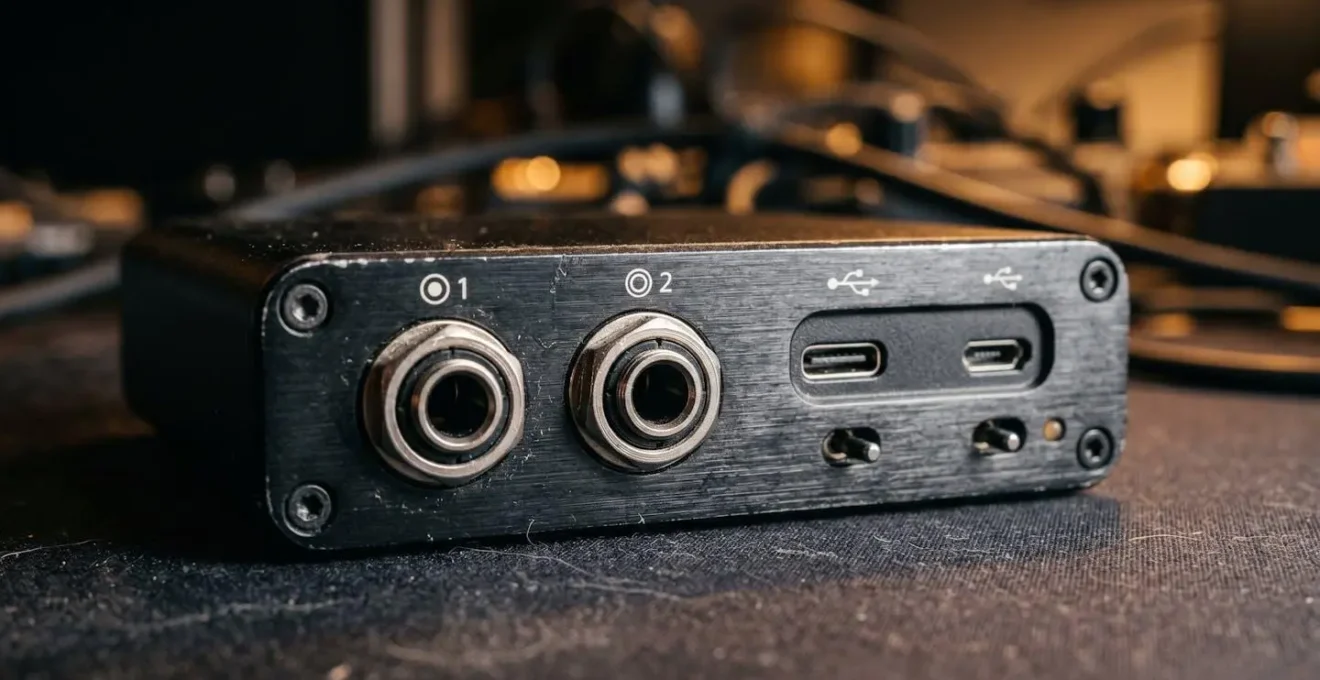
Investing in a quality interface is the single biggest upgrade for playback reliability. It provides cleaner audio, robust connections, and a stable link in your digital chain. Your rig should also include redundancy: spare cables, adapters, and even a backup playback device if the gig is critical. This isn’t paranoia; it’s professionalism.
Voice Memos vs DAWs: capturing Ideas Quickly
The iPad can be a powerful studio, but not all musical ideas require a full production environment. The conflict between capturing a fleeting idea and the friction of setting up a Digital Audio Workstation (DAW) is real. For many songwriters, this leads to what music producers describe as having hundreds of accumulated voice memos with no completed songs. The key is not to choose one tool over the other, but to create an « Idea Funnel » that leverages the strengths of both.
This workflow begins with frictionless capture. The built-in Voice Memos app is perfect for this first stage. Its purpose is to record raw melodic hums, lyric fragments, or chord progressions the instant inspiration strikes, with zero setup time. The discipline comes in the next step: immediately applying a structured naming convention (e.g., DATE-KEY-BPM-TYPE-DESC) to make the idea searchable later. From there, a weekly review process, or « triage, » helps you tag the most promising ideas using the app’s built-in tools.
Only the best ideas are promoted to the DAW. By importing the original voice memo into a dedicated audio track in Logic Pro or Cubasis, it serves as a raw reference. You can then develop the idea on new tracks, adding layers and structure while always being able to refer back to the initial spark. The tipping point for moving an idea fully into the DAW is when you need layered harmonies, precise tempo mapping, or drum loops—tasks that are cumbersome or impossible in a simple voice recorder. This structured funnel ensures that creative sparks are captured instantly but are also systematically processed into finished productions.
Learning Fast Solos: Apps that Change Speed Without Pitch Shift
One of the iPad’s most powerful practice features is its ability to manipulate time. Apps like Anytune and Moises use advanced time-stretching algorithms to slow down audio without altering its pitch, making it possible to deconstruct complex musical passages. However, simply slowing down a track is a crude approach. A more effective, professional method is to apply the principle of progressive overload, a technique borrowed from athletic training.
The process starts by importing the track and, if possible, using the app’s AI audio separation to isolate the instrument you’re learning. Set the initial tempo to a speed where you can play the passage perfectly—typically 60-70% of the original. The next crucial step is to create a tight, precise loop around the specific bars that are giving you trouble. Instead of manually nudging the speed up, you configure the app to automatically increase the tempo by a small increment (e.g., 2%) every few successful repetitions (e.g., every 4 loops). This forces your muscle memory to adapt gradually and consistently.
This method removes guesswork and emotional frustration from the practice session. You are systematically building speed and accuracy. It’s also important to use the app’s built-in EQ to boost the mid-range frequencies of the target instrument, making its articulation clearer against the backing track. Once you can play the looped section cleanly at around 95% of the original tempo, you should then practice the entire solo in context to ensure a smooth integration with the rest of the song. This is a workflow that builds mastery, not just familiarity.
Sibelius vs Dorico: Choosing the Right Notation Software
While apps like ForScore are for reading music, professional composition and engraving still largely happen on desktop-class software. For decades, Sibelius was the undisputed industry standard. However, Dorico, built by many of the same developers who originally created Sibelius, has emerged as a powerful modern competitor with a different philosophy. Choosing between them is about understanding your primary workflow: speed vs. intelligence.
Sibelius is often favored for its speed and familiarity, particularly in film scoring and commercial music where deadlines are tight. Its workflow is very direct and has been refined over many years. Dorico, on the other hand, is built around a more intelligent, semantic understanding of music. It handles complex musical concepts like multi-voice staves, instrument changes, and page layout with more automation and elegance, often producing a more aesthetically pleasing result with less manual tweaking. This « smarter » approach can mean a steeper learning curve but can save significant time in the long run on complex projects.

The iPad fits into this workflow not necessarily as the primary composition tool (though apps like StaffPad and Dorico for iPad are increasingly capable), but as a portable satellite. You can use Apple’s Sidecar feature to turn your iPad into a secondary touch-screen monitor for your Mac, using the Apple Pencil for note input. More commonly, you can export PDFs of your work-in-progress from your desktop and use your iPad with ForScore to review, annotate, and test your compositions away from your main computer, creating a fluid creative ecosystem.
Tone Suck: Why Long Cheap Cables Kill High Frequencies
In the analog world, guitarists are obsessed with « tone suck »—the loss of high-frequency sparkle caused by long, high-capacitance cables. In the digital realm of an iPad rig, a similar and even more destructive phenomenon exists, but it manifests as latency, data dropouts, and digital noise. The culprit is often the same: cheap, low-quality cables and adapters. The integrity of your digital signal chain is paramount.
When you connect a guitar or microphone to an iPad via an audio interface, every connection point is a potential point of failure. A cheap, uncertified USB-C hub or a flimsy Lightning-to-headphone adapter is often the weakest link. These accessories are not built to handle the consistent, high-bandwidth data transfer required for real-time audio. According to guidelines for professional digital audio setups, using high-quality, certified USB or Lightning cables is a critical first step to prevent data dropouts that can cause clicks, pops, or total signal loss.
Beyond cables, latency itself is a form of digital « tone suck. » This delay between playing a note and hearing it can make performing feel disconnected and sloppy. This is managed by adjusting the buffer size in your audio app or interface’s control panel. A lower buffer size reduces latency but demands more CPU power, increasing the risk of system instability. A higher buffer is more stable but increases latency. Finding the sweet spot for your specific device and app combination is a crucial part of optimizing your digital rig for live performance. The goal is to make the technology disappear, and that only happens when the signal chain is pristine and the latency is imperceptible.
Key takeaways
- A professional iPad setup is defined by reliable workflows and fail-safes, not just the apps you own.
- Bypassing the headphone jack with a dedicated audio interface is the most critical upgrade for stage-ready audio quality and reliability.
- The principles of analog signal integrity (good cables, proper gain) are just as crucial in the digital world to avoid « digital tone suck » and latency.
Cables and Amps: Why Your £2000 Guitar Sounds Like Mud
You have a premium instrument, a powerful iPad, and a top-tier amp simulation app. So why does your tone sound flat, lifeless, or like it’s buried under a blanket? The answer almost always lies in improper digital gain staging. Just like in an analog setup, the signal level must be optimized at every stage of the chain to maintain clarity and dynamics. If the signal is too low, you’ll be amplifying noise. If it’s too high, you’ll get harsh digital clipping that sounds far worse than warm analog distortion.
Optimizing this signal flow is a methodical process. It’s about ensuring a strong, clean signal travels from your instrument, through the audio interface, into the app, and out to your speakers or headphones without being degraded. This process is so fundamental to achieving a professional sound with a digital rig that it requires its own checklist. Mastering digital gain staging is the final, crucial step in making your expensive gear sound as good as it should.
Action plan: Digital Gain Staging 101
- Instrument Output: Set your instrument’s output volume to about 75% as a starting point. This provides a strong signal with enough headroom for dynamic playing without clipping at the source.
- Interface Preamp Gain: Play your instrument at its loudest and adjust the audio interface’s preamp gain so the input meter peaks around -12dB to -6dB. Critically, avoid ever hitting the red (0dB), which indicates digital clipping.
- App Input Level: Inside your amp sim or DAW, check the input gain setting. Ensure the signal entering the app is in its optimal range, again avoiding any internal clipping indicators.
- Monitor the Noise Floor: If you have to crank the interface gain above 75% just to get a decent level, you likely have a problem earlier in the chain. Check your instrument cables or connections for signal loss.
- Verify the Output Chain: If the tone is still muddy, test your entire setup with a pair of high-quality studio headphones connected directly to the interface. This helps isolate whether the problem is your guitar, cable, interface settings, app, or the external speakers/amp you are monitoring through.
To truly leverage your iPad as a professional musical tool, the next step is to methodically apply these workflows. Begin by auditing your current setup, from your cables and adapters to your app settings and pre-show checklists, and start building a system you can trust.